Overview
Any individual article or unit you buy, sell or use is considered an Item. Items are the backbone of your company and they can be a service, a collection of items - Kit, an assembly, a regular part, a non inventory.
Adding an Item
When an Item is created, it needs to be defined into an Item Group (e.g Part, Service, Job, Non-inventory Part etc.). The system has a listing of frequently used Item Groups that can meet the needs of your business. If there is a need to create and establish criteria for an Item Group, you can create custom Item Group names via the Item Group Profile List, located in the setting's panel.
An Item can be physical like a part or assembly but it can also be a Service or Other Charge like shipping. Before an Item is added to the system, the following points are to be considered:
- Whether to track inventory for the item.
- Whether to use a bill or materials or kit.
- Is the item part of a style.
- Whether an item should be marked as being serialized or lotted.
To add an item, click on the Create New drop-down menu and select Item. This will lead you to the Add Item page.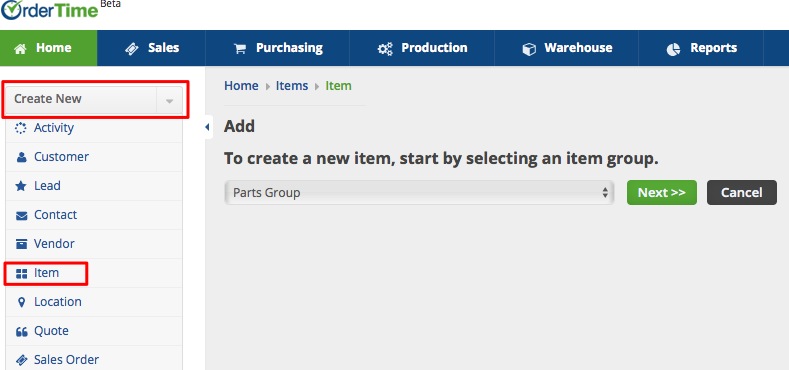
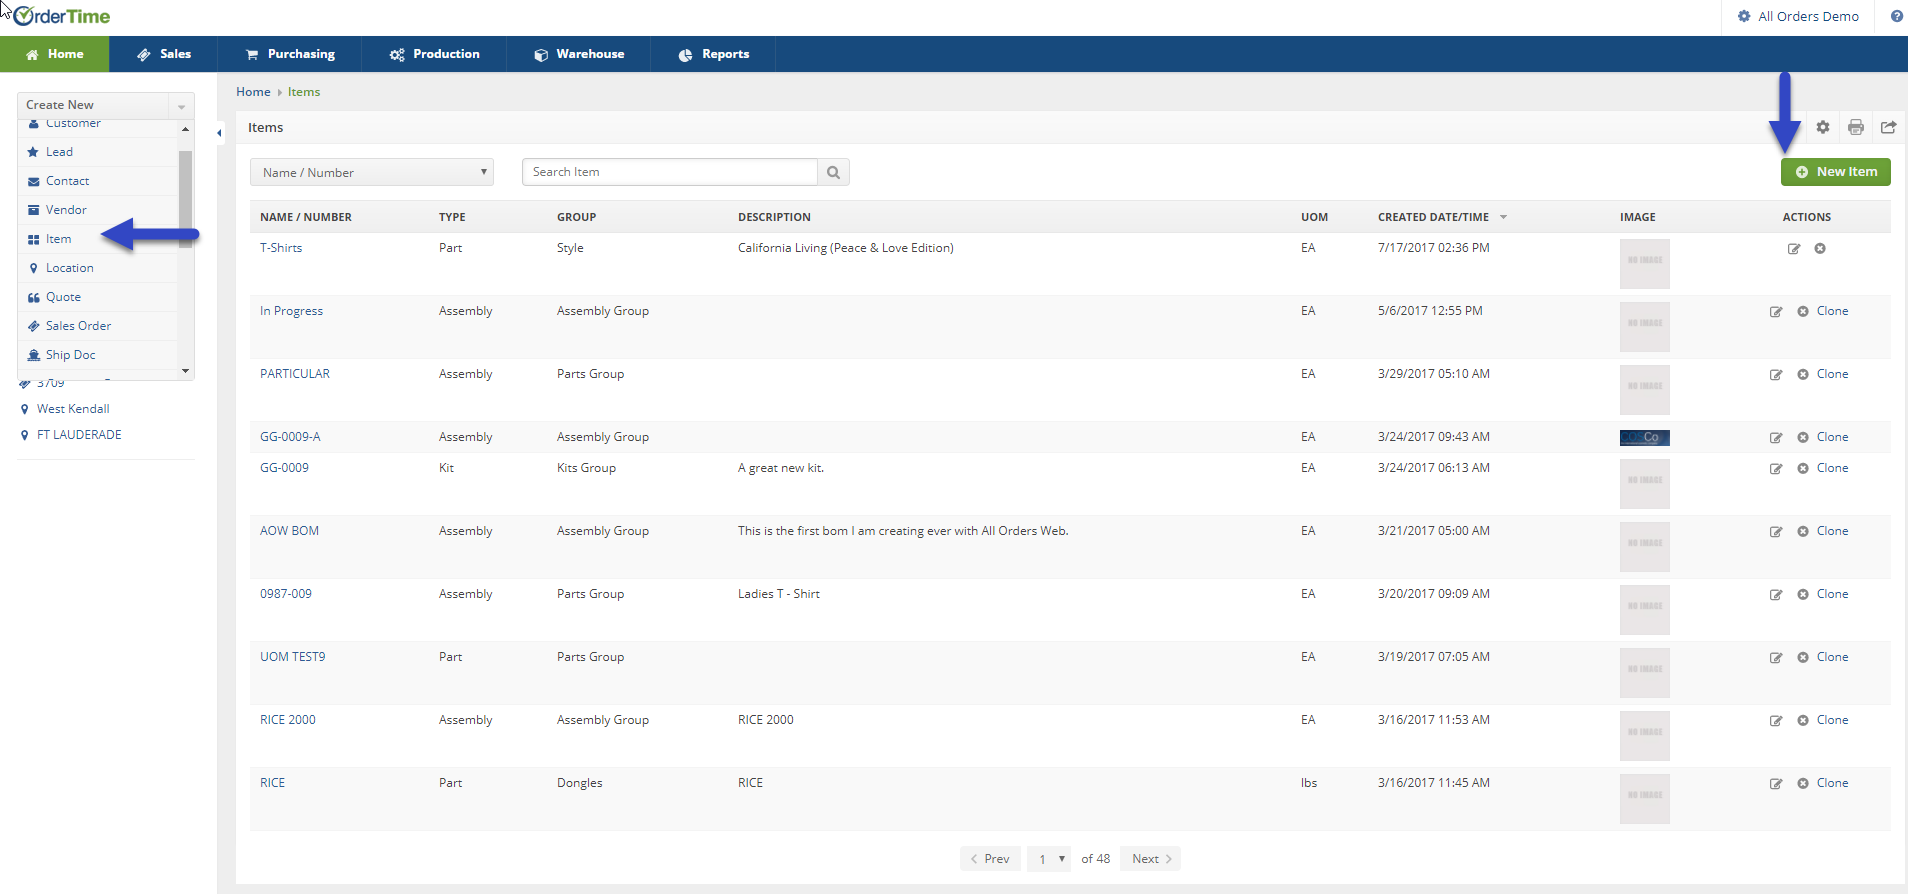
Alternatively, you can click on the Open Full List drop-down menu and select Items . Click the +New Items button from the Item List page. This will also lead you to the Add Item page.
Selecting an Item Group is an essential function, see Selecting an Item Group to further understand how an Item group is used by the system. You can also add an Item Group in the system to suit your special requirements.
Item Group drop down menu
The Item Group drop-down menu will provide you with a listing of available Item Groups. Assign a group to your new Item. The group assignment given to your item will drive how the items in this group are represented in your inventory.
Click the Next>> button to proceed to the next screen.
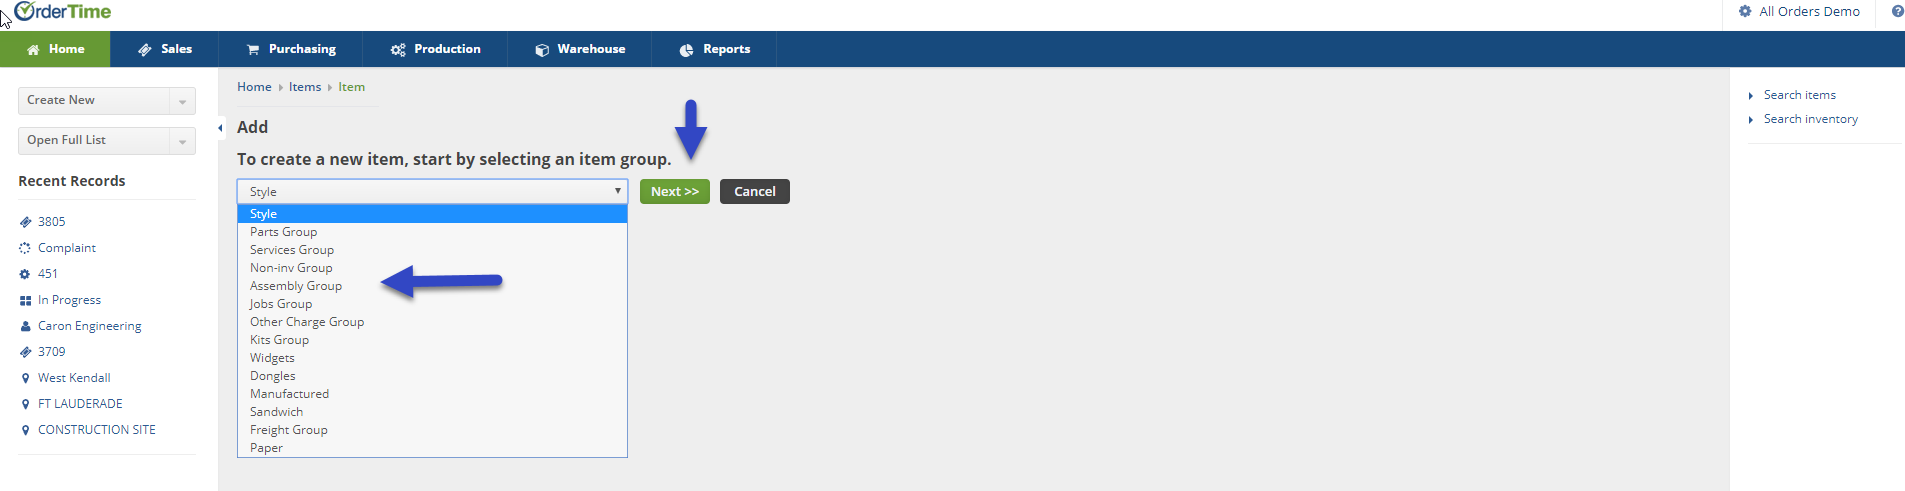
- You can create custom Item Group names via the Admin Profile List, located in the Admin panel. The Item Group contains all the information about that specific group (i.e. Item Type, Default Accounts, UOM's & Item Cost Type). By pre-filling those fields in, you will save time when you are ready to create a new item. (See Group Profile List set up)
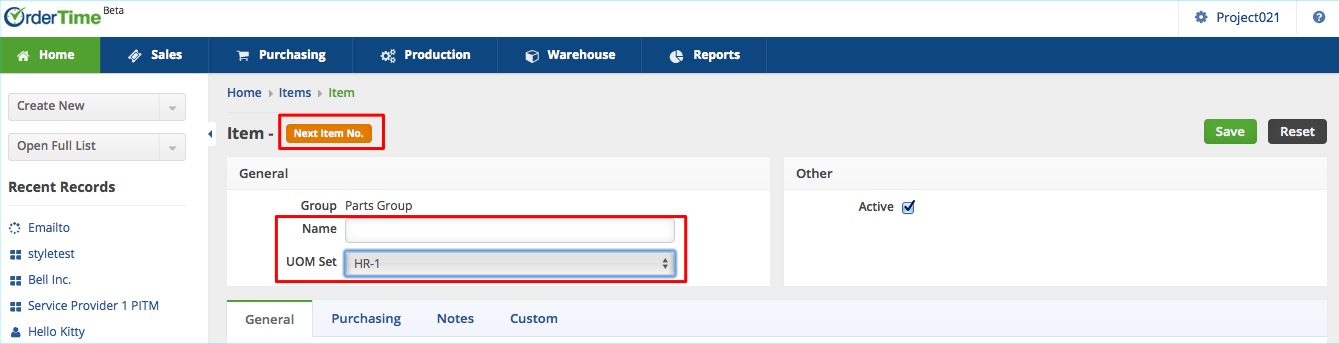
Based on the Item Group selected, you will be brought to that specific Item Group's template screen. On the template screen, the following information is needed.
- Type the name or Number of the Item.
- The Next Item No. button is available if your Item names are partially numeric, the system will generate the next number in sequence.
- Select the UOM Set, the Units of Measure Set. This setting will define how our items will be Sold As, Purchased As, Used As.

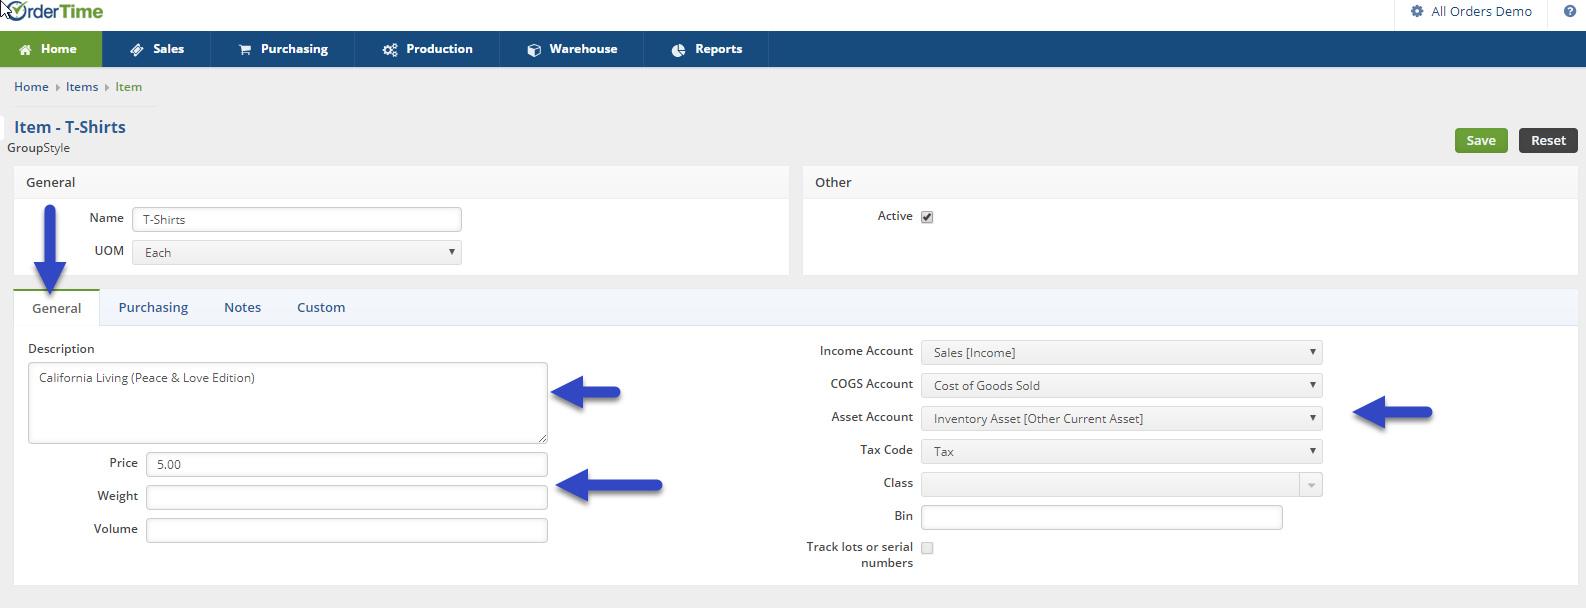
Completing the General information tab
General information tab is used to enter general descriptive information about the Item, set its weight and volume (for parts), and specify financial information such as price, accounts, price level, and whether the Item is taxable.
Under the General tab you will be able to enter the following information:
- Description: The description of the item that will be shown on customer facing documents.
- Price: The standard price that the item sells for.
- Weight: The weight of the item.
- Volume: The volume of the item.
- Income/COGS/Asset/Expense Accounts: The accounting accounts that will be applied to the items.
- Tax Code: Assign a tax code specifying whether the item is taxable or not.
- Default Class: The default class that will be applied to the item for accounting class tracking purposes.
- Bin/Location: This is the default bin/location where an item will be received into when it is added to a document. It can be manually changed on each individual transaction.
- Track lots or serial numbers: If you wish to track lots or serial numbers for an item it must be a part or assembly and you must select this checkbox.
- Warranty: This will be available when you select 'Track lots or serial numbers'. Select the warranty and length a customer gets when shipping an item.
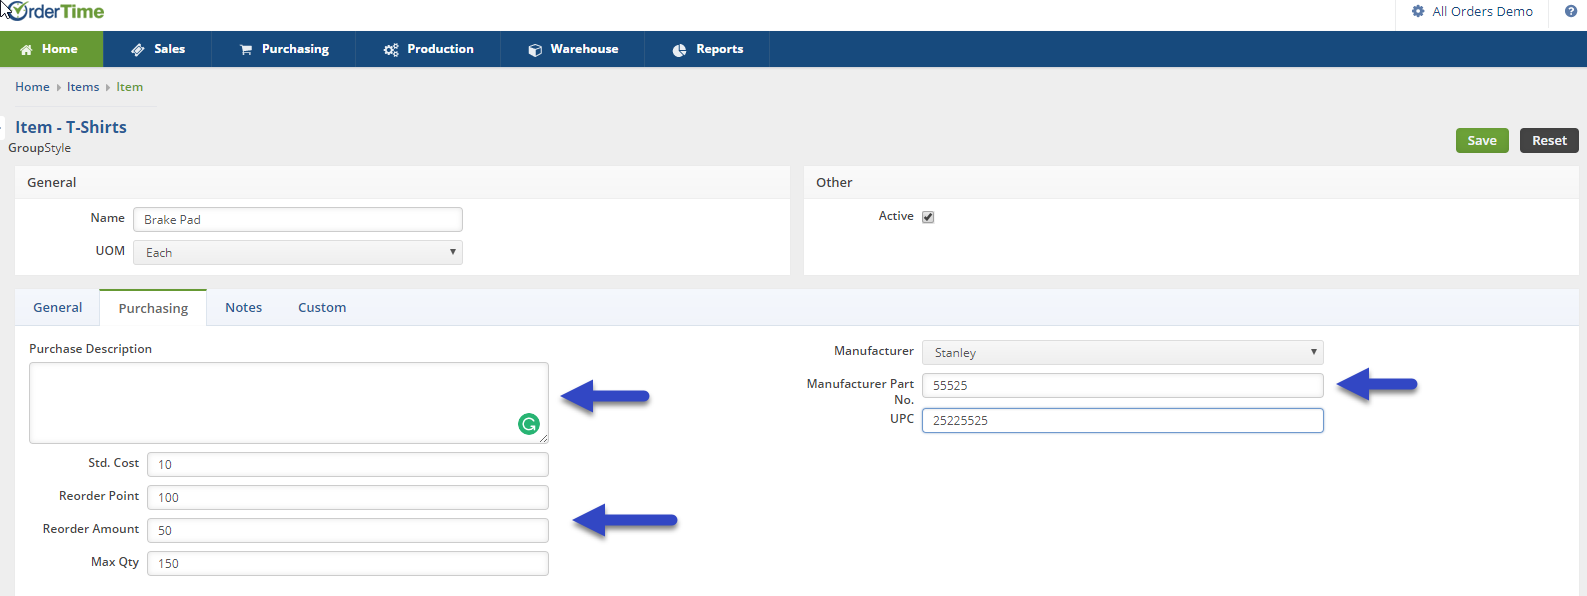
Completing the Purchasing tab
On the Purchasing Tab you can detail purchase information, such as cost, reorder point, reorder amount, and maximum quantity. You can add information about the Manufacturer, and even select preferred Vendors from whom you routinely procure the Item.
PLEASE NOTE: Any Field moved into the Purchasing Tab via the Item Editor Page Layout is not visible to Kits.
Any default field that is removed from the default Purchasing Tab will cause a 500 Error when editing a Kit Item.
Under the Purchasing tab you will be able to enter the following information:
- Purchase Description: Provide concise purchase information that will be shown on user or customer facing documents.
- Std. Cost: The standard cost of the item. When the item is being purchased and no cost can be found with a preferred vendor. This is the default cost at which the item will be purchased at. It can be manually changed on each individual transaction.
- Reorder Point (Build Point for Assembly): If stock levels fall below the quantity entered here, the item will be flagged as needing to be reordered by the Reorder Analysis. Reorder Points can be updated in bulk based on past usage by using the Recalculate Reorder Points Screen.
- Reorder Amount (Build Amount for Assembly): When reordering items through the Reorder Analysis you can specify how much you want to reorder based on a few different criteria. The Reorder Amount quantity is one of the options for the quantity you want to reorder each time you place an order with your vendor for the item.
- Max Qty: The Max Quantity is the most quantity that should ever be in stock for an item at any given time. When reordering an item through the Reorder Analysis, if the amount that is going to be placed on order will push the total quantity in stock over the Max Quantity, the amount placed on the order will be reduced so as not to go over the Max Quantity.
- Manufacturer: The manufacturer of the item. You can manage your list of available manufacturer through the Manufacturer Profile List screen.
- Manufacturer Part No: The manufacturer's part #. Once entered, the manufacturers part # of any item can be scanned onto any document to add the item to the document.
- UPC: The UPC of the item. Once entered, the UPC of any item can be scanned onto any document to add the item to the document.
Notes tab
Under the Notes tab, you can write additional information that would describe the item in detail.
Custom tab
The customs field under this tab will reflect the Custom Settings you have entered in the systems for your Items Selection.
You can add create add or deleted Custom Fields as needed. System Admin can be accessed Custom Fields by clicking on the Gear Icon top right hand corner, under the Setting section select Custom Fields.
Click Save.
At this point, your item has been entered in the system. You can add additional details, such as images, attachments and vendor information by filling out forms in other tabs. Refer to Details for more information.
Merging Items
There is an option to merge items when needed. This will merge transactions, quantities, lot/serial numbers and bin numbers. Keep in mind there are crucial considerations to be made when merging items. For a more detailed description on how to merge and more information about the merging process please refer to Merging Items.