Generate a Purchase Order
To generate a new purchase order from the Side Menu > Create New > Purchase Order, follow the steps below.
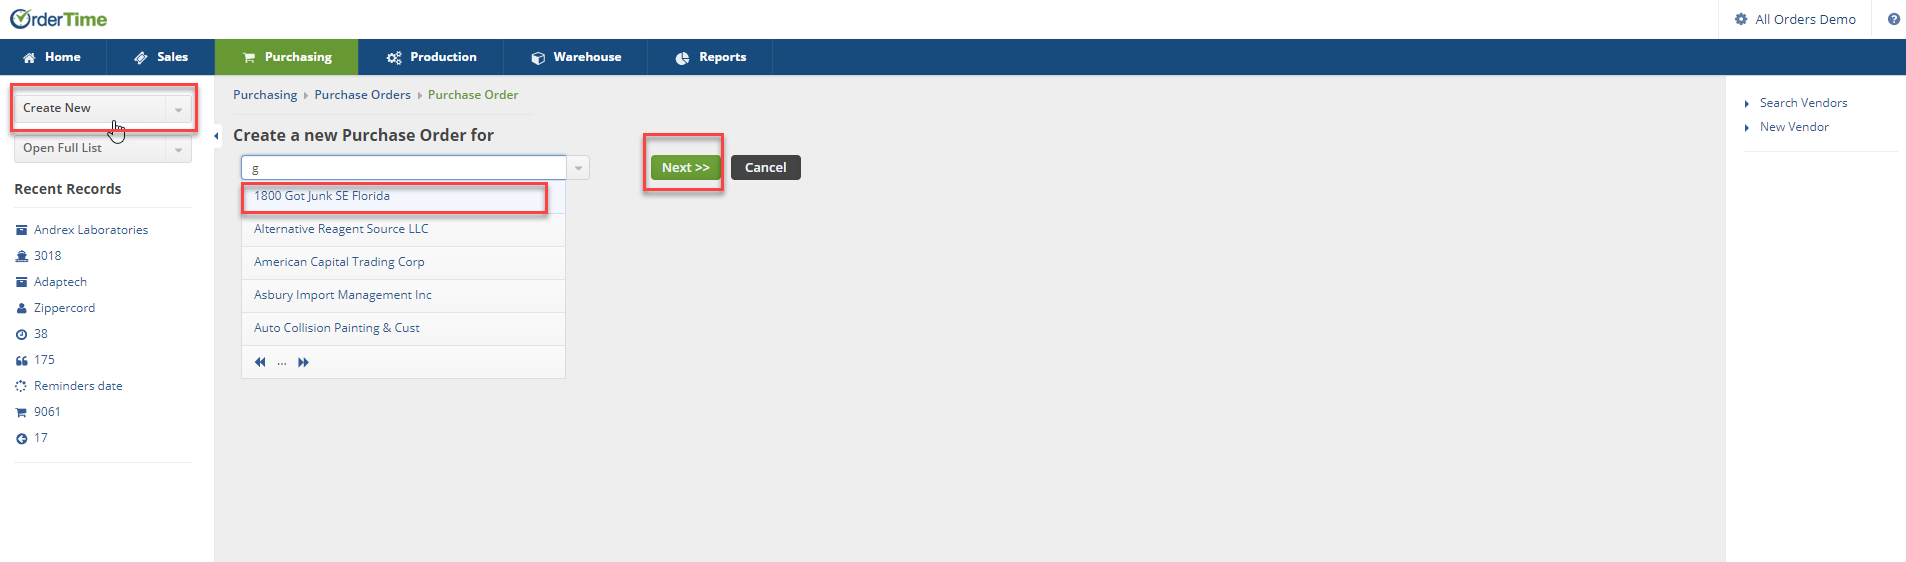
- Open the side menu and click on the Create New drop-down menu.
- Select Purchase Order from the menu.
- On the screen, type the Vendor's name. When the Vendor's name has been entered or selected from the drop-down menu, click Next>>.
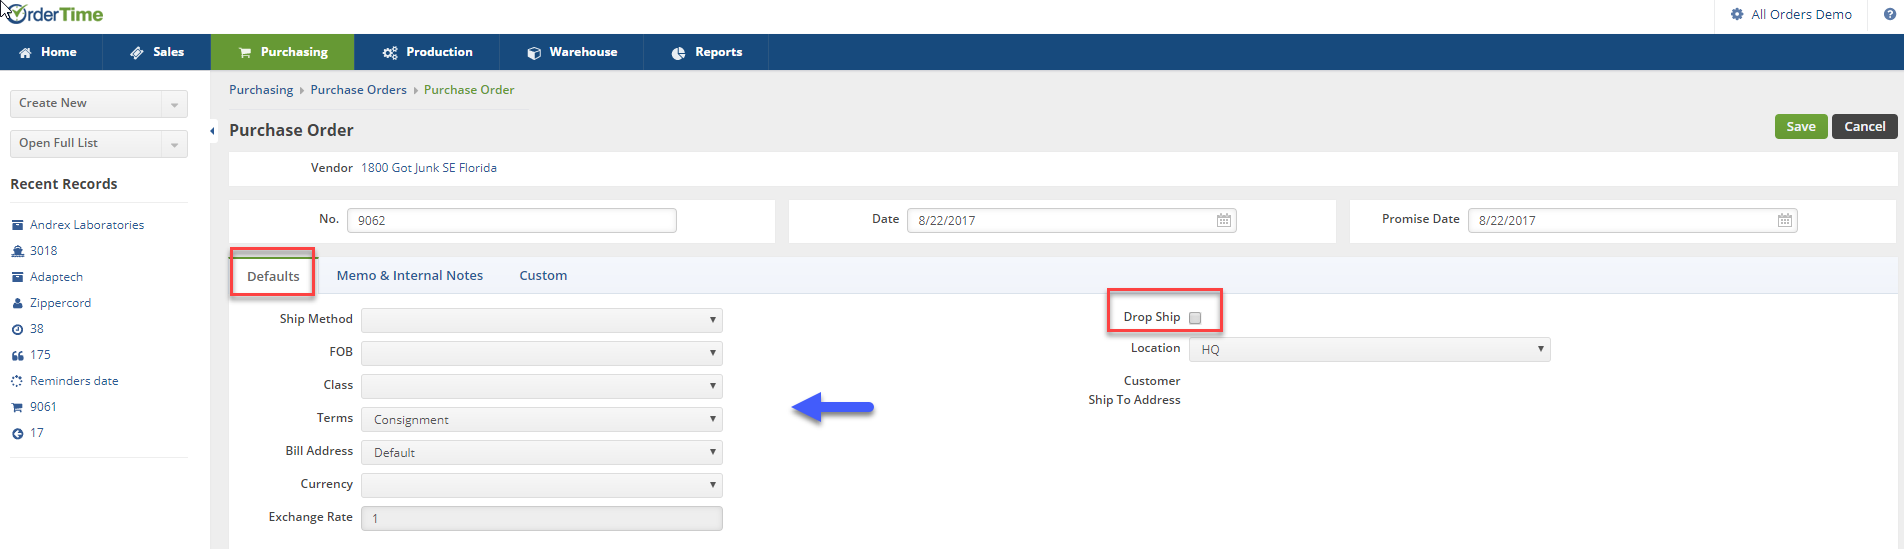
4. Once you click on Next>>, the next screen will prompt you to enter the information below:
- Select Date from the date box.
- Enter the Promise Date.
- Under the Default tab select the following from each drop down menu:
- Ship Method
- FOB (Freight on Board)
- Class
- Terms
- Select the Bill Address.
- Currency
- If needed, enter an Exchange Rate,
- Click on the Drop Ship checkbox if the PO will be shipped directly from the Vendor.
- Select location.
The system allows you to drop ship items directly to your customers and track them. Track drop ship orders by selecting Purchase Orders from the Open Full List drop-down menu. You can either enter a PO # or select a vendor from the listing. When the POs are listed, use the filter option (Gear icon) and select Drop Ship from the menu. Under Operator, select "equal to" then select "True" under Criteria. Click on Save when done.
5. Enter information relevant to the PO under the Memo & Internal Notes:
- Notes on the memo will be displayed on the PO
- Internal Notes will only be view by reviewing the PO

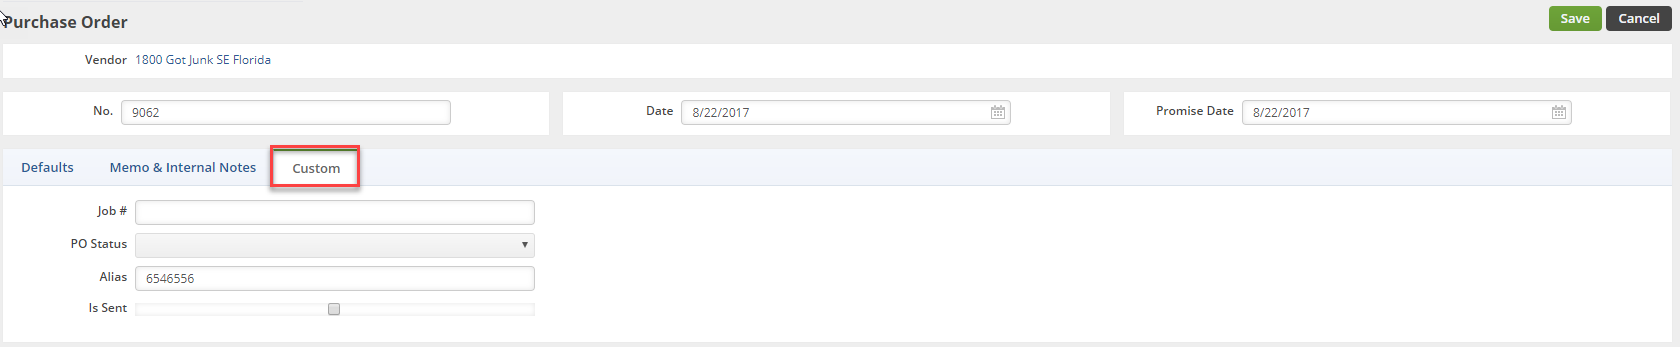
6. Under the Custom tab, you can specify if the PO is part of a Job, Assembly. The Custom tab can be customized to your preferences.
- Specify if this PO is part of a Job #.
- Select the PO status.
- Type an Alias if needed (i.e. Bicycle components for customer X, or a Number of your choice).
7. Click Save when done.
Select the Items for your Purchase Order
On the Purchase Order screen, you will be able to enter your items, enter notes, review dependencies, add attachment, view open activities and activity history. Complete the steps below to enter your items:
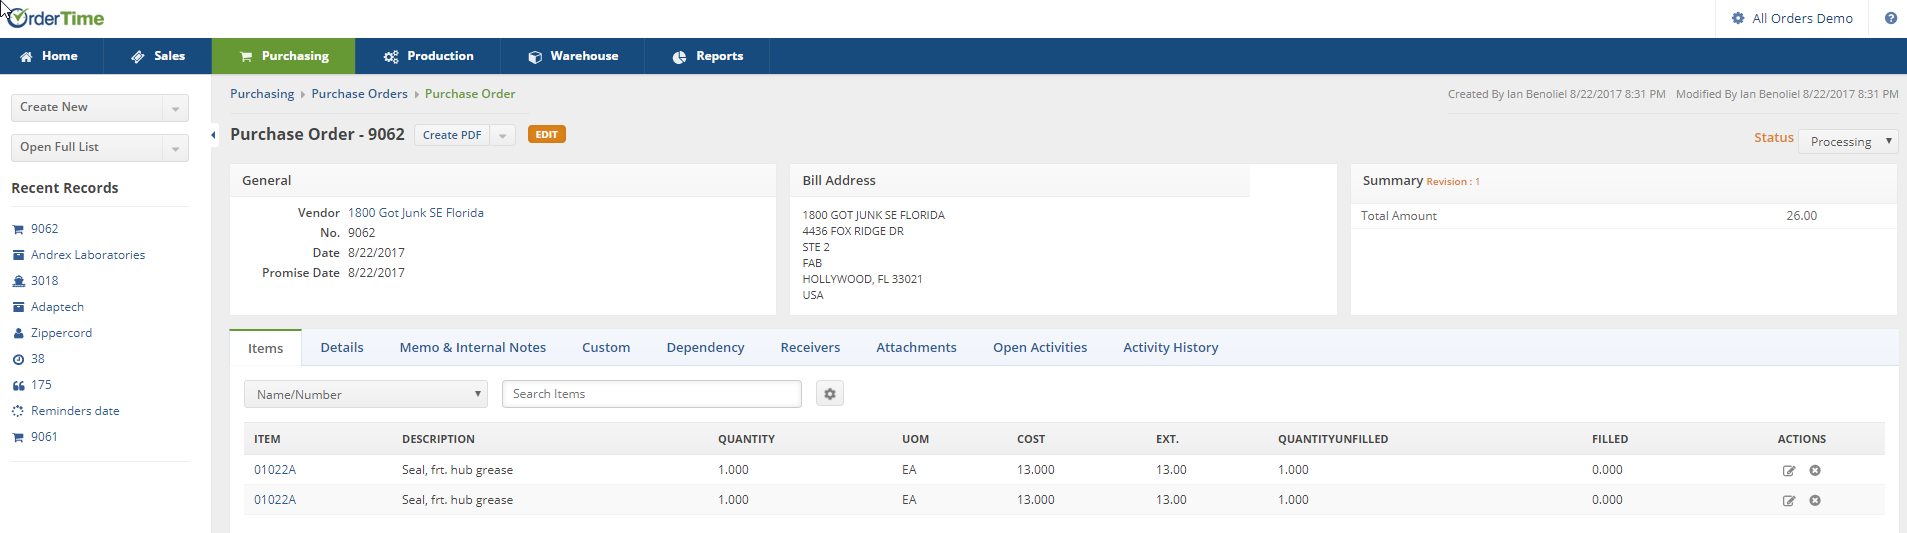
- Under the Items tab, enter item number or name.

2. The cost will auto populate. You also have the option to change pricing as needed.
- You have the option to select item identification by using the drop down menu and selecting the appropriate identifier (i.e.Name/Number, Description, UPC, Manufacturer Part Number, Vendor Part No.).
3. Click Save to move on to the next item.

Once you have selected and saved the items for PO, the screen will display the the items description, quantity, UOM, cost, Quantity Unfilled, Filled.
The Tabs on screen can be used to review or add information for your PO. These tabs are valuable tools to track your Purchase Orders.
- You can view or add a memo/internal notes to communicate with other employees who are viewing the PO.
- Under the Dependency tab, you can view if the PO is tied to Sales Orders.
- Open Activity and Activity History tabs can be used to review the vendor's activity history.
- Add an activity and assign a task to vendors, company employees. (Example: Assign a task to an employee-"Keep track of a Drop Ship")
- The Activity History tab can be a helpful communication tool for your business and vendor.
- Under the Activity History tab you can send an email to your employees or vendor. The conversation will be recorded for tracking purposes.
Purchase Order Status Menu
Once all the necessary information has been entered into your Purchase Order, you are ready to proceed to change the status of the Purchase Order. On the top right side of the screen next to Status, use the drop down menu to change the status of your Purchase Order. The following status options will be available for your Purchase Order:
- Processing: Purchase Order processing means you are in the process of recording PO Inquiries. Generating those inquiries into “firm orders” will require the completion of necessary documents to permit PO to be fulfilled.
- Approved: Purchase Order has been approved.
- Sent: Purchase Order has been approved and presented to the Vendor.
- Voided: Purchase Order has been voided.
- Closed: Purchase Order has been closed.
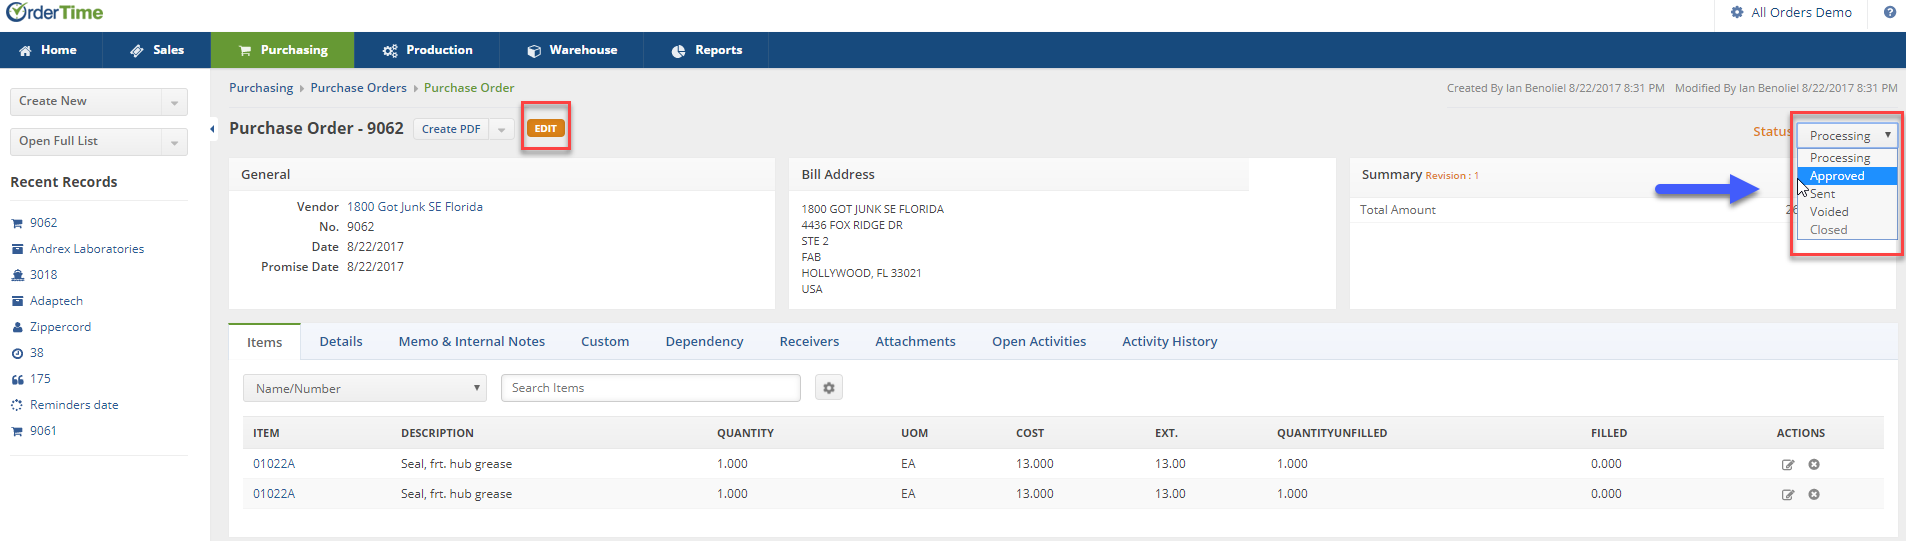
When you are ready to process the Purchase Order, select Approved or Sent from the status drop down menu .
You must change the the PO status to Approve or Sent for the Purchase Order to be received.
The approval process will depend on your company's Purchase Order approval setting.
- Manager's approval might be required for approving the Purchase Order.
- The manager will receive a notice to approve.
- Based on your approval settings, a company employee can approve Purchase Order. (See User Roles process for the steps.)
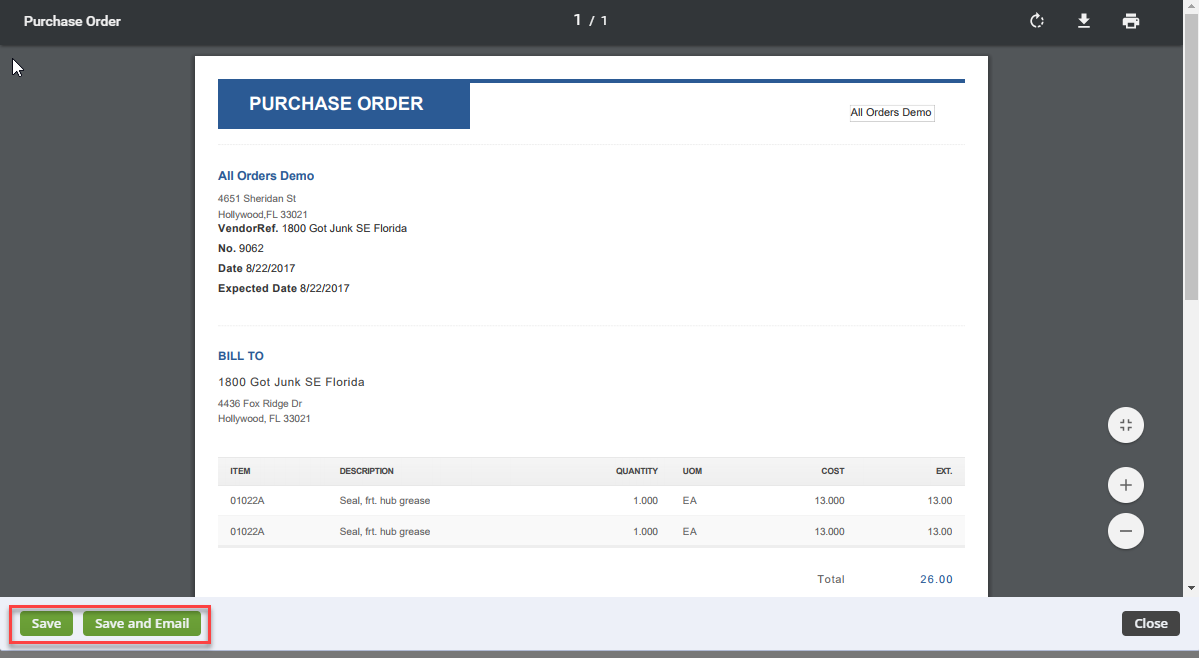
Printing your Purchase Order
A Purchase Order can be printed and email to your Vendor.
- Clicking on the Create PDF icon next to the Purchase Order number. A pop-up window will open and you can select Save and Email icon.
2. The Send Email screen will pop up, fill the information as requested. You will have the option to attach additional information, carbon copy individual in your company. An email template is provided, select appropriate template from the Template drop down box.
3. The next step will be to receive the Purchase Order. (See Receiving for more information.).
