To access the B2B Portal settings, go to Admin > B2B Customer Portals > B2B Customer Portal Settings.
Please note, only the Order Time Master Administrator has access to configure the B2B Portal settings, other Order Time users can not access the settings.
On this screen you will set up the numerous customization options available to make your portal reflect your company's branding and more. I'll go through each tab in detail.
General Tab
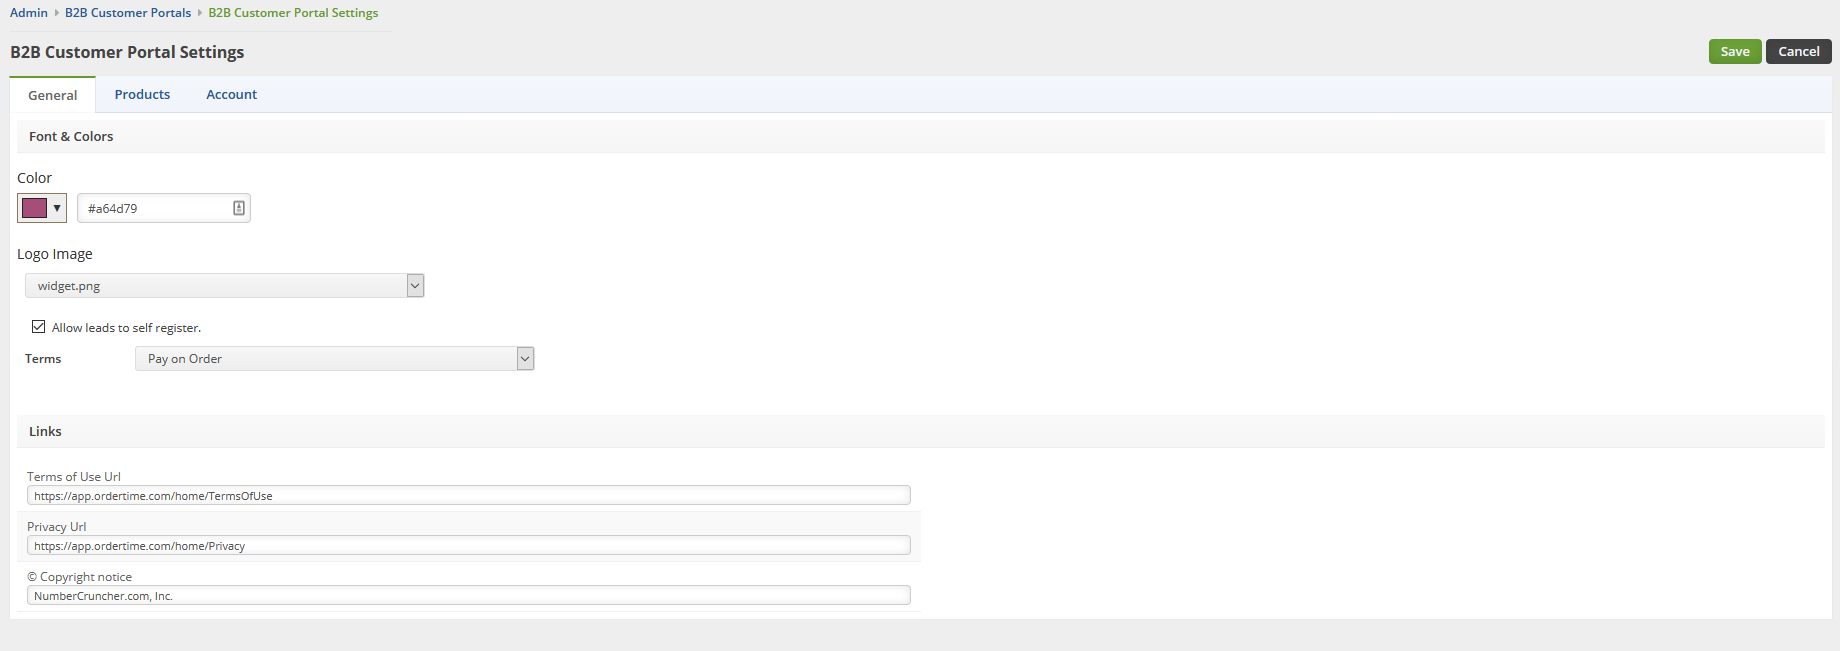 General Tab under B2B Customer Portal Settings
Font & Colors
- Color - Set the general color theme for your B2B Portal. You will be able to go back and edit these settings later to fine tune it.
- Logo Image - Choose from the drop-down. To add more go to Admin > Company Info > Images Section > Add
- Allow leads to self register - Checking this makes it so that the Register link shows up. Customers can register for portal access
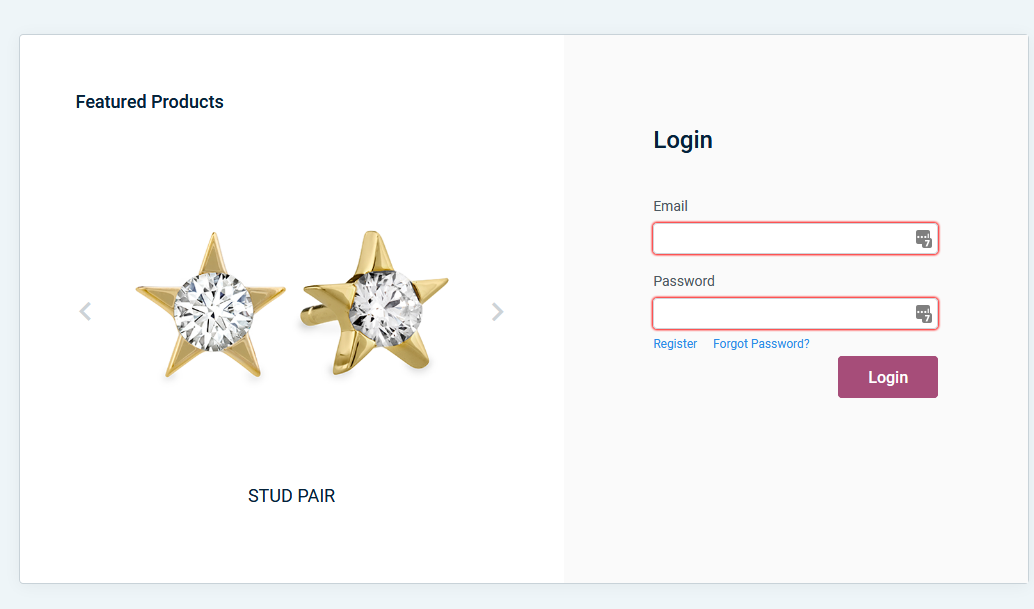 Register Link
Links
- Terms of Use URL - (Ex. https://app.ordertime.com/home/TermsOfUse)
- Privacy URL - (Ex. https://app.ordertime.com/home/Privacy)
- Copyright Notice - (Ex. NumberCruncher.com, Inc.)
Products Tab
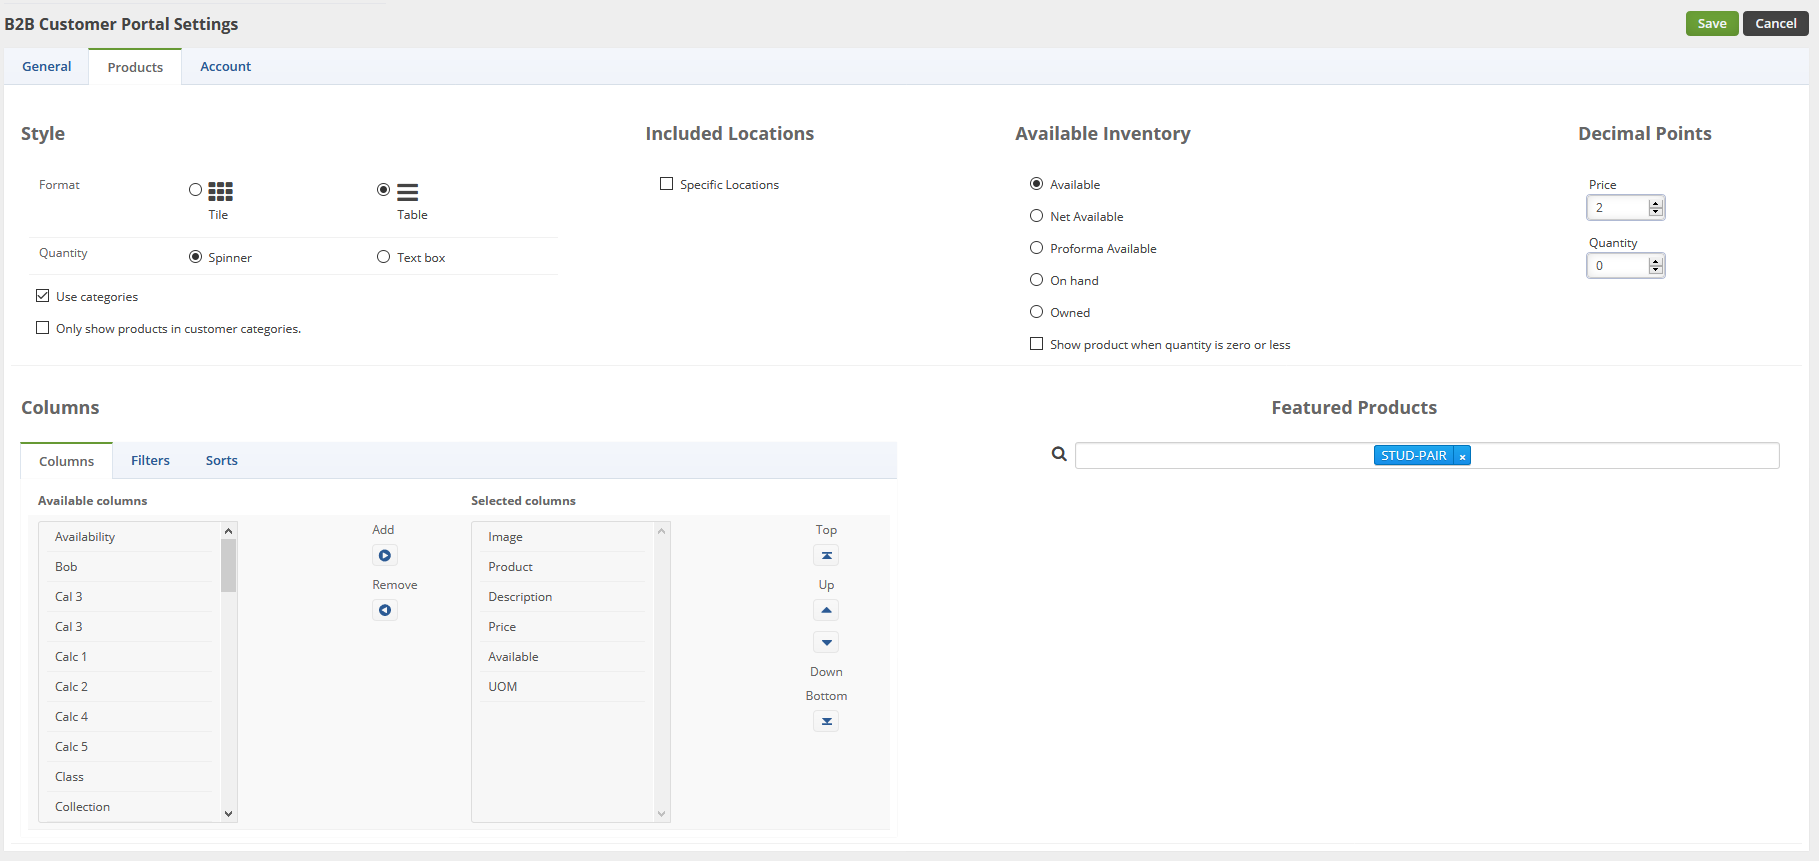 Products Tab under B2B Customer Portal Settings
Style
- Format
- Tile - Displays products in a grid
- Table - Displays products row by row
- Quantity
- Spinner - Allows them to click an up or down arrow to add quantity
- Text Box - Must type in quantity in a text box
- Use Categories
- Checked - Uses the categories set up in Admin > Profile Lists > Categories
- Unchecked - Doesn't pull from those
- Filter Customer Categories
- Checked - Filters by the Customer Categories setup in your Customer Editor (These are Top-Level vs. Nested Categories)
- Unchecked - No Customer Category filtering
- Format
Included Locations
- Specific Locations
- Checked - Limit this portal to only pull from specific locations
- A text box appears, click on it to see a list of your locations
- As you click on them they get added, click the little X to remove them.
- Unchecked - Will display inventory from all locations according to your Item filters
- Checked - Limit this portal to only pull from specific locations
- Specific Locations
Available Inventory
- Available - Show Available
- Net Available - Only Show Net Available
- Proforma Available - Only Show Proforma Available
- On Hand - Only Show On Hand
- Owned - Only Show Owned
- Show product when quantity is zero or less
- Checked - Product will still show up in the grid / rows even though it has no quantity
- Unchecked - Products with zero or less quantity won't show up in your portal
Decimal Points
- Price - How many decimal points to allow for your Price Field
- Quantity - How many decimal points to allow for your Quantity Field
Columns
- Columns - Set the columns that appear for your portal Items (Ex. Image / Product / Description / Price / Available / UOM)
- Filters - Set the default Item Filters (Ex. Group / Price)
- Sort - Set the default Item Sort (Ex. Price / Size)
Featured Products
- Choose up to 5 Featured Products for your carousel
- You can start typing in a product name, or just click on the textbox for a drop-down list
- Click on the items you'd like and it adds them to Featured Products
- Click the little X next to one to remove it from the list
Account Tab
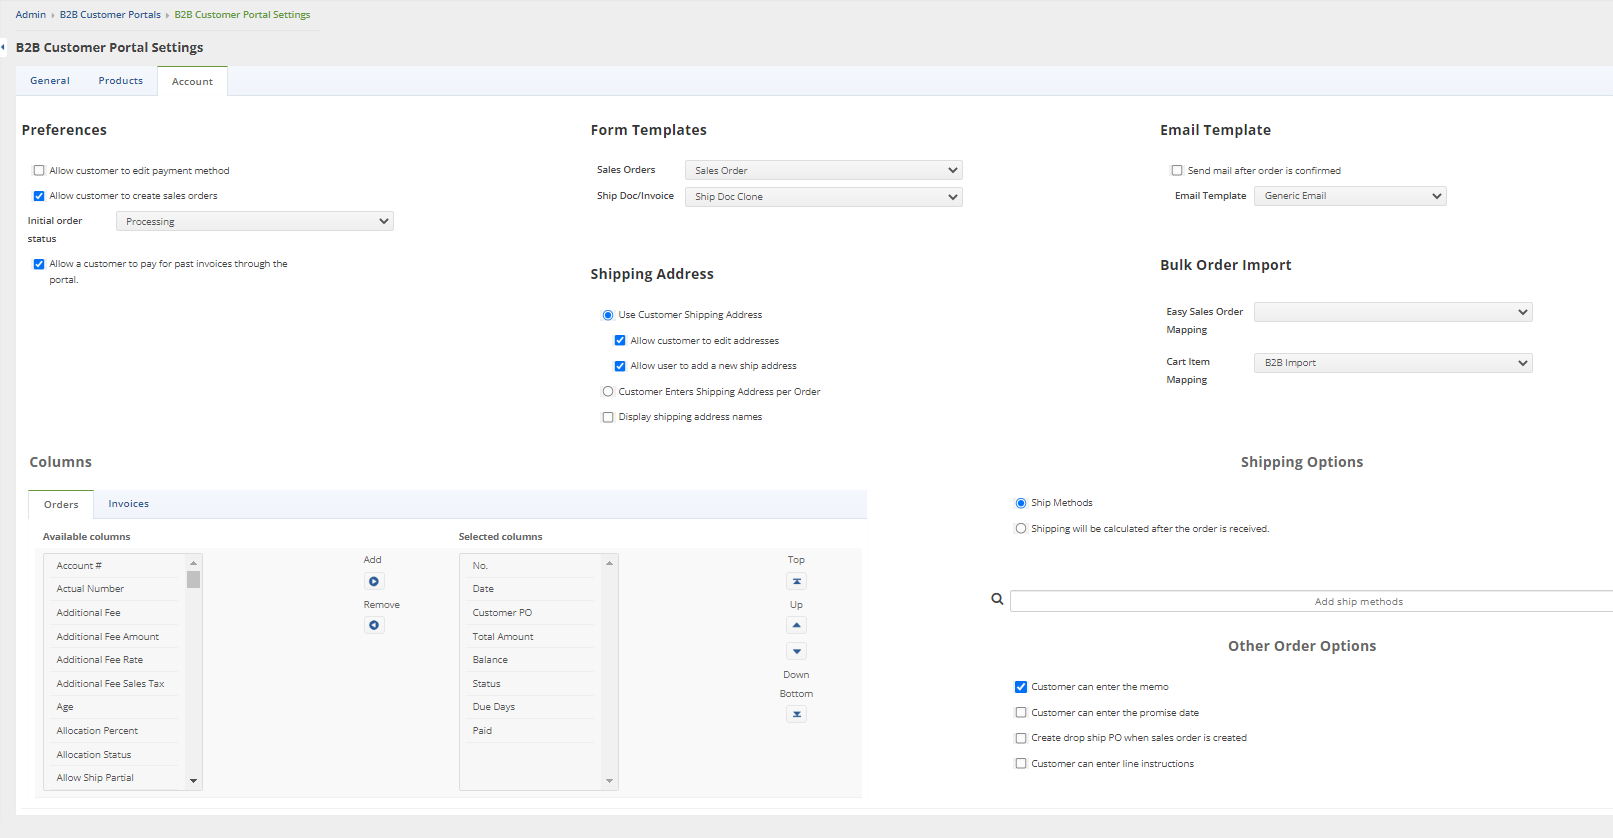
Preferences
- Allow customer to edit addresses
- Checked - Allows the customer to edit their shipping and billing address
- Unchecked - Customers are unable to change their addresses, you control changes
- Allow customer to edit payment method
- Checked - Allow the customer to change their credit card on file
- Unchecked - Customers are unable to change their payment method, you control changes
- Allow customer to create sales orders
- Checked - This is the default, it allows them to cart an order and at the end it becomes a Sales Order
- Unchecked - This doesn't allow the order to be carted. At the end they can just reference the order.
- Create Linked PO when sales order is created
- Checked - Creates a linked Purchase order when the Sales Order is created at the end.
- Unchecked - No Linked PO is created
- Allow customer to edit addresses
Form Templates
- Sales Orders - Choose from the drop-down which Sales Order Template to use
- This will display to the customer
- When they select the Print button, this is the template that will be used for the PDF
- Ship Doc / Invoice - Choose from the drop-down which Ship Doc / Invoice Template to use
- This will display to the customer
- When they select the Print button, this is the template that will be used for the PDF
- Purchase Orders - Choose from the drop-down which Purchase Order template to use
- This will display to the customer
- When they select the Print button, this is the template that will be used for the PDF
- Sales Orders - Choose from the drop-down which Sales Order Template to use
Email Template
- Send mail after order is confirmed
- Checked - Will send an email to the Customer Email on file
- Select your preferred Email Template from the drop-down provided
- Unchecked - No automatic e-mails will be sent
- Checked - Will send an email to the Customer Email on file
- Email Linked PO to vendor
- Checked - Will send an email to the Vendor Email on file
- Select your preferred Email Template from the drop-down provided
- Unchecked - No automatic e-mails will be sent to the vendor
- Checked - Will send an email to the Vendor Email on file
- Send mail after order is confirmed
Columns
- Orders - When your customer selects to view their Open Orders, these are the columns that appear to them on that list
- (Ex. No. / Date / Customer PO / Total Amount / Status)
- Invoices - When your customer selects the button to View and pay invoices, these are the columns that appear to them on that list
- (Ex. No. / Date / Customer PO / Total Amount / Balance)
- Orders - When your customer selects to view their Open Orders, these are the columns that appear to them on that list
Shipping Options
- You can select between:
- Shipping Methods - This utilizes the search drop-down below, select the shipping methods you would like to show the customer.
- Shipping Carrier Accounts - This utilizes the shipping carrier accounts that you have setup and shows them to the customer.
- Shipping will be calculated after the order is received - This allows you to calculate and charge the customer for shipping later from the Sales Order that is created. The customer will not have shipping options to choose from while carting the order.
- In this section you can force the Shipping Methods you would like to offer.
- This is similar to the Featured Items Section
- You can start typing in a Shipping Method, or just click on the textbox for a drop-down list
- Click on the methods you'd like and it adds them to the Shipping Methods
- Click the little X next to one to remove it from the list
- You can select between:
Other Order Options
- Customer can enter the Memo
- Customer can enter the Promise Date
- Create Drop Ship PO when Sales Order is created
- Customer can enter line instructions


- MAKE SURE YOU HIT SAVE ON THE TOP-RIGHT
- You can always return to these settings by going to Admin > B2B Customer Portals > Click Configure on the Portal
- TO APPLY ALL OF THESE CHANGES YOU MUST REFRESH YOUR PORTAL
- To do this go to Admin > B2B Customer Portals > Click Refresh Portal (It's below the Configure & Deactivate Buttons)
- Next Step, Learn How to Set Up Categories
