The work flow for counting inventory is as follows:
- A New Count is created in Order Time.
- The Count is downloaded to the mobile device referenced by the Count #.
- The user is free to walk around; and uses the to count / scan quantities.
- The user submits the counts back to the Order Time server.
- The Count is updated is updated in Order Time to reflect the counts performed on the device.
- You Finalize the Count within Order Time as usual.
Instructions
Download Orders
- Login
- Click Count from the Activity Panel
- Scan or type the # of the existing Count. Click GO to download the Count's information and open the Count View Screen. Click Reset to clear out the entered number and start over. Click Change Activity to go back to the Select Your Activity screen.
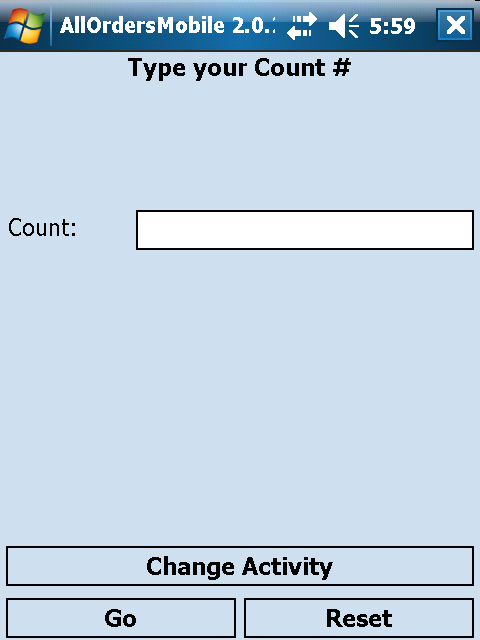
- Count View screen: You will see the Count # and the location which is going to have it's inventory quantities counted.
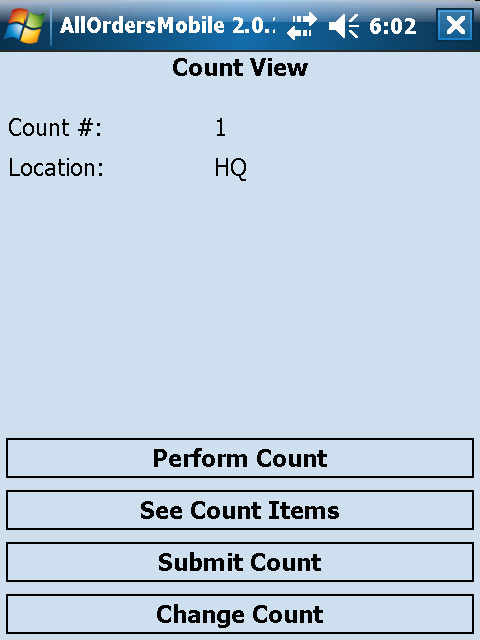


See Count Items
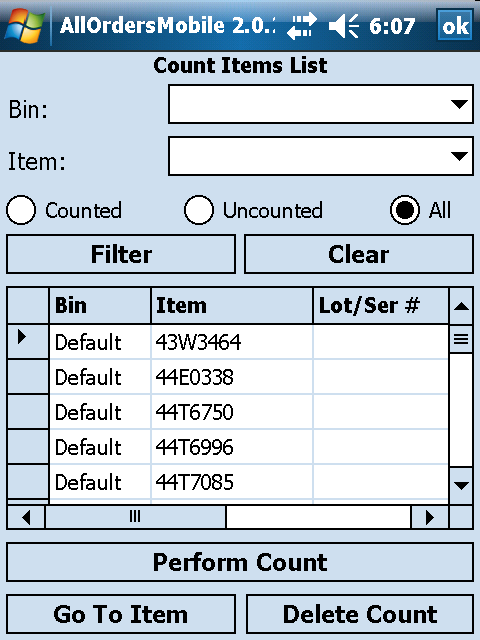
Click See Count Items to view the Count Items List screen. Using this screen you can view all the items that can be counted along with the Lot/Serial #s, the new quantity which has been counted, the current quantity before the count took place (if the current user has permission to view current quantities while counting) and the difference between the current quantity and the newly counted quantity. A Bin, Item and count status can be specified at the top of the screen to filter the list. After specifying this information click Filter to filter the list. Click Clear to remove an existing filter. Click the Perform Count to go to the Count Item screen. Highlight an item in the list and click Go To Item to edit the count for that specific item. Highlight an item and click Delete Count to delete the count for only the selected item.
Count Item Screen
From the Count View screen, click Perform Count to open the Count Item Screen.
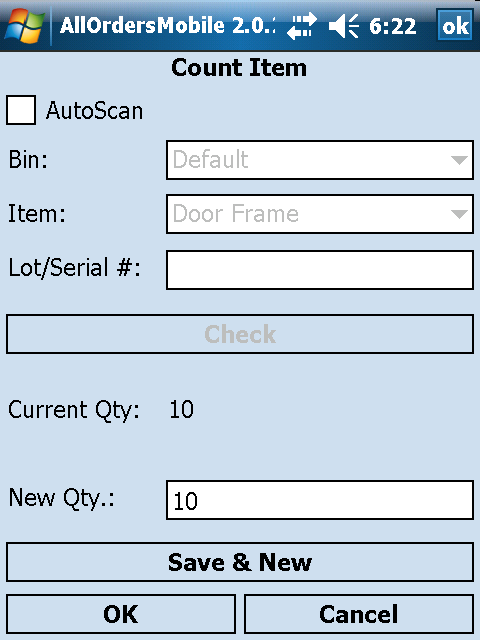
Auto scan and auto check
Check the Auto Scan box if you are going to be scanning with a bar code reader on the device and want to increment the quantity counted by 1 each time a scan is performed. Be sure to set your escape character on your scanner to be a Tab to ensure it functions properly. Leave Auto Scan unchecked if you would like to enter the item name manually, select non default bins, or need to manually enter quantities. You can still scan the item by placing the cursor in the Item entry field and then scanning the bar code. Once the Item entry field has an item name or bar code entered, a bin has been selected (if the item is not being counted in the default bin), and a Lot/Serial # has been specified (if the current item has lot/serials #s) click the Check button to bring up the New Qty entry field. If the current user has permission the Current Quantity will also be displayed for reference purposes. Click Save & New to save the new quantity that has been specified for the item/bin/lot # and to count another item. Click OK to save the new quantity and exit the screen. Click Cancel to clear the count that is currently being performed without saving and exit the screen.
Check the Auto Check box (not shown above) to automatically perform the function performed when you click the Check button. The Check button will bring up the New Qty entry field. If the current user has permission the Current Quantity will also be displayed for reference purposes. Click Save & New to save the new quantity that has been specified for the item/bin/lot # and to count another item. Click OK to save the new quantity and exit the screen. Click Cancel to clear the count that is currently being performed without saving and exit the screen.
Video Tutorial
You will see some screen shots from All Orders (NumberCruncher's desktop app) but All Orders Mobile works the same way for Order Time.
