Overview
Ship Docs are the ultimate sales transaction in Order Time. It shows the items the customers purchased. When inventory items are involved, it is the Ship Doc that deducts inventory.
Below are the different ways to create a Ship Doc:
Ship Docs usually correspond to Sales Orders to show how much of the Ship Doc needs to be filled. A Ship Doc can be created directly from the Sales Order once its status is Approved.
If created from a Sales Order, all information from the Sales Order will be brought in to populate the fields. Otherwise, you have to fill them in manually.
A Ship Doc can also be created for a customer with multiple sales orders.
Creating a Ship Doc from a Sales Order
Once the Sales Order has been approved, a Ship Doc can be generated. A Ship Doc is the final step to completing a sales transaction; the document will display the fulfillment stage (i.e. Committed, Picked, Shipped, Voided etc.)
Once a Sales Order has been approved, it will convert into a Ship Doc order with a different number from your Sales Order. Click the +Ship Docs button.
The information contained on a Ship Doc is used by the system to generate an invoice in Accounting.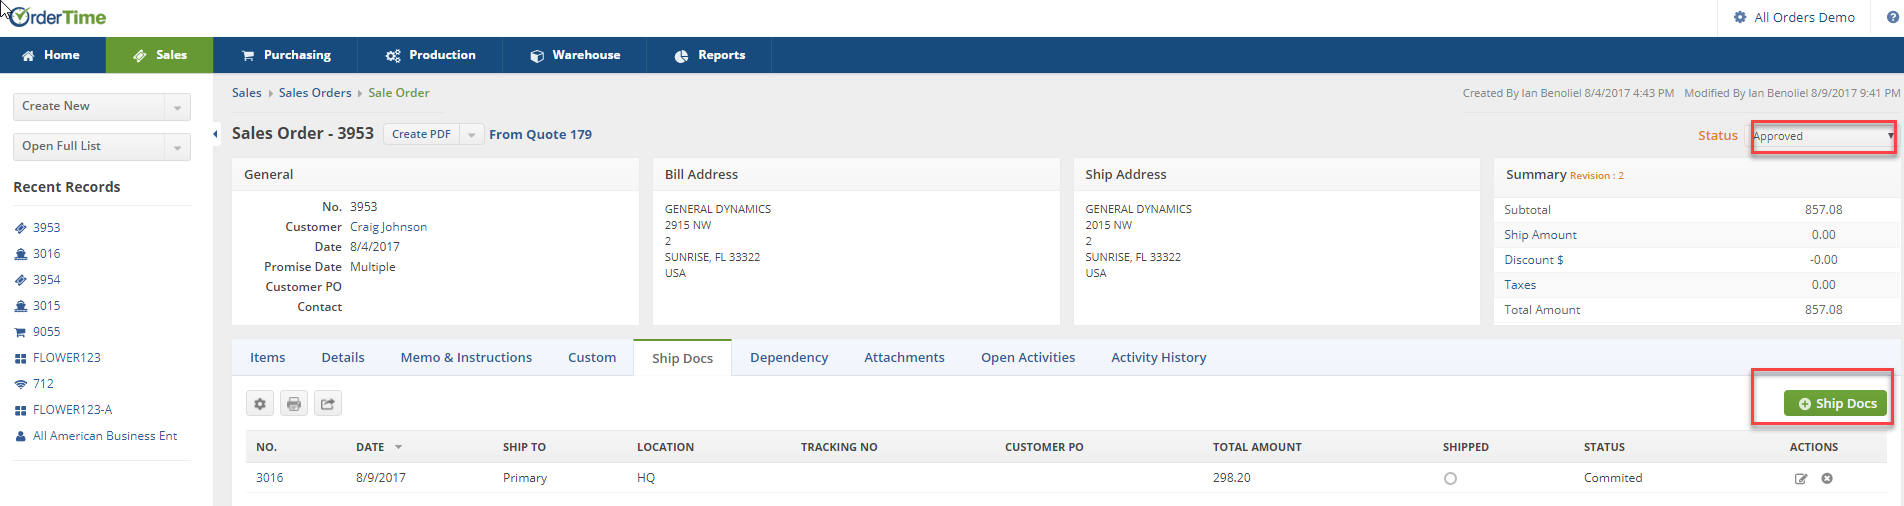
If there is a large list of Items on your Sales Order but not enough stock to fully Ship there is the option to select Items from the Sales Order to create the Ship Doc with using the Select Items to Ship button
Creating Ship Doc Manually
It is important to note that Ship Docs can be created without Sales Orders.
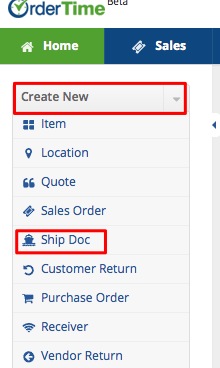
You can create a new Ship Doc from scratch by choosing Create New Ship Doc. This can be handy for complimentary items or other situations in which no formal order was placed, yet you are still shipping something out to a Customer and wish to keep track of it.
To create a new Ship Doc:
- Click on the side menu.
- Select Create New.
- Select Ship Doc from the drop down menu.
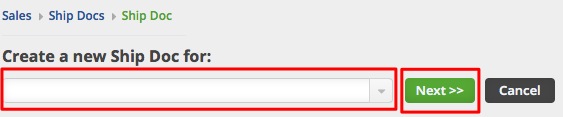
- Enter the customer name on the Create a new Ship Doc for box. A drop-down menu will provide you with a list of customers that are already in your database. Select the appropriate customer.
- Click on Next>> to proceed to the next screen.
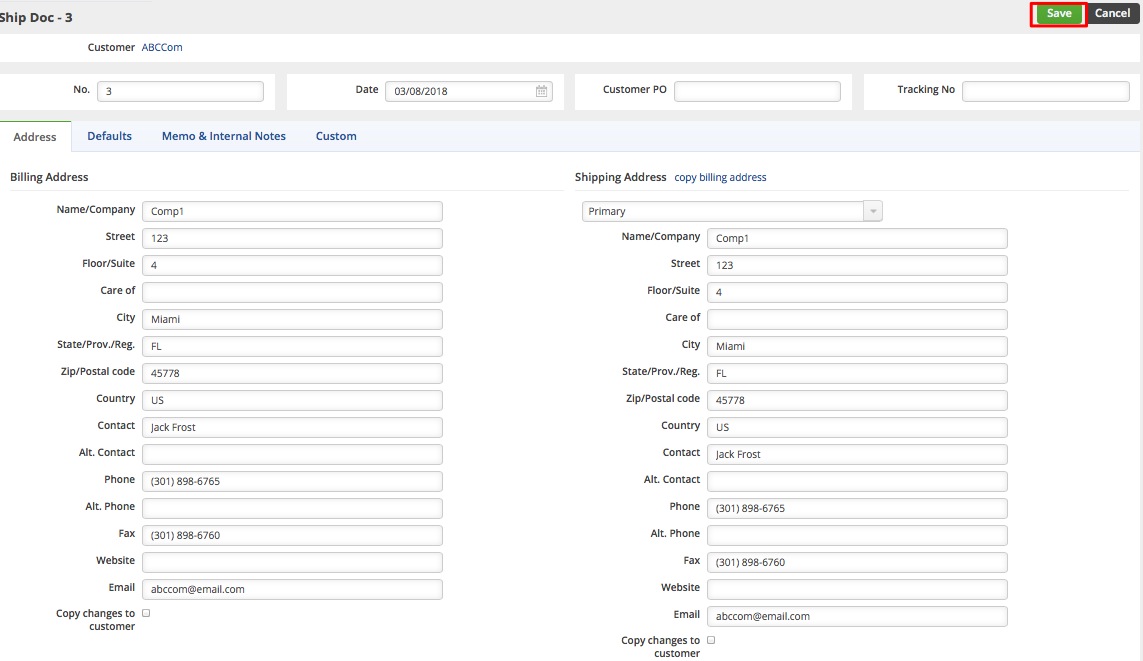
- Review the customer information, specifically the shipping address. If they are different, make changes as needed to insure the Ship Doc has the correct billing address and will be sent to the correct shipping address.
- Select the Date if it is different from the day of origination. (Date is auto-filled)
- Enter Customer's Purchase Order (PO) number if a PO was received from your customer; and Tracking Number, if applicable.
- Provide more details by completing the other tabs: Default, Memo & Instructions and Custom.
- Click Save.


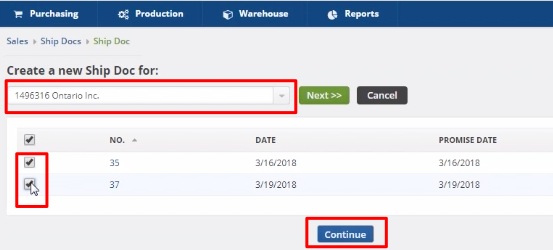
Creating a Ship Doc for Multiple Sales Orders
OrderTime provides a functionality that allows you put multiple sales orders in to a single Ship Doc. You can create a single Ship Doc for multiple Sales Orders by following these steps:
- Click Create New.
- Select Ship Doc.
- Enter the Customer Name. Once the customer’s name is entered, a list of Sales Orders (associated with the customer) will be displayed.
- Select the Sales Orders that you want to include by clicking on the corresponding boxes.
- Click Continue.

If you want to add multiple Sales Orders in to one Ship Doc, check the setting in Company Preferences > Shipping and make sure that the ‘Add the items to an unshipped Ship Doc having the same Customer & Location’ option is selected.
You can also do the following in the Ship Doc page:
- Use the Edit button next to the Create PDF drop down menu to make changes.
- Send emails, add attachments, create a log, and add notes to your Ship Doc.
- Under the Memo & Instruction tab, you can include notes and Date Stamp as needed.
- Create a PDF file of the Ship Doc.
- Add and set up packages.
- Update the status of the Ship Doc.
You can directly change the field values by clicking on the line item (item row). Field boxes will appear, and you can add details or edit the information accordingly.
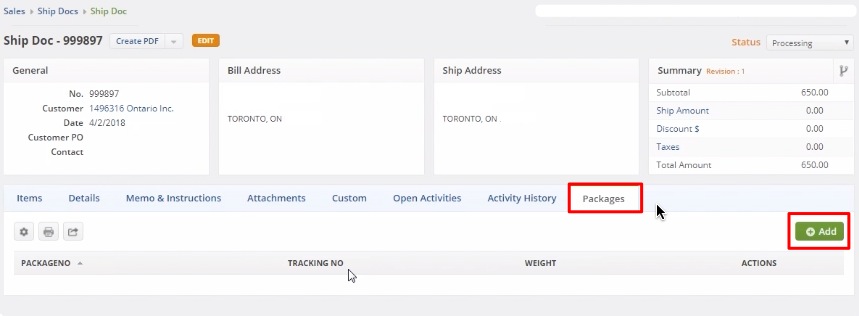
Adding Packages
In addition to the standard information related to Items, such as Item Number, UOM, Price, Quantity and others, the Ship Doc contains the Packages tab which enables you to create packages that “box up” your items. This also allows you to know the number of packages you have created for a specific Ship Doc.
Packages in Company Preferences: Make sure to set up your Company Preferences for Packages. Go Settings > Company Preferences > Shipping > Packages tab.
Package Type in Profile Lists: Go to General > Profile Lists > Shipping > Package Type to set up different package types.
Add packages by following these steps:
- In the Ship Doc page, select the Packages tab.
- Click the +Add button.
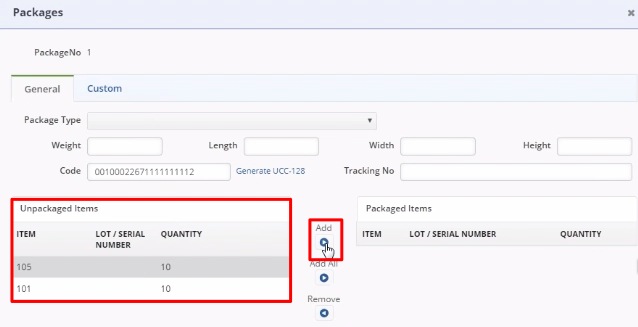
- The Packages pop-up window will appear. Select the Package Type from the picklist. The dimensions and weight will be populated when a package type is selected.
- Click Generate UCC-128 link to fill out the Code. Refer to Shipping article for additional information.
- Fill out the Tracking No. field.
- Under the Unpackaged Items, you will see your Items with their corresponding Item Number and quantity. To add the items in the package, select the line item and click Add.
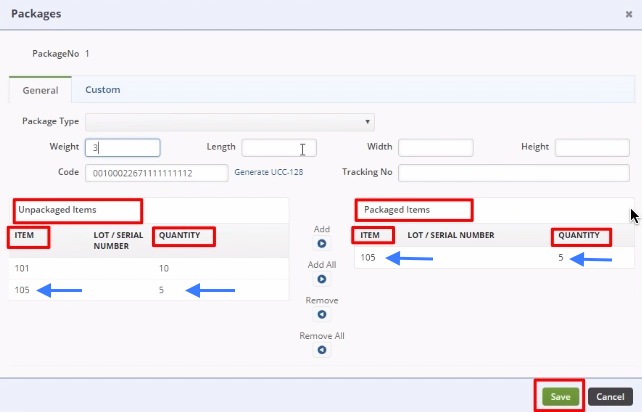
- The line item will move to Packaged Items. Under the Packaged Items, you can leave the quantity as is or change the quantity by clicking the number under Quantity and typing in the desired value. Note: If there are any unpackaged items, the number (quantity) left will reflect under the Unpackaged Items.
- Click Save.


After saving, the Ship Doc page will updated with the details of the newly created Packages details. Repeat the steps to add more packages.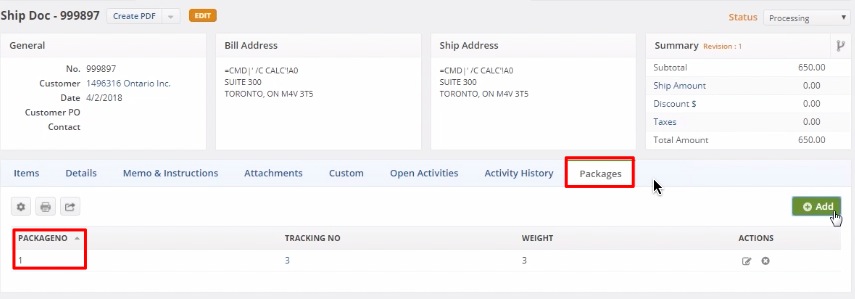
Processing your Ship Doc Transaction
Once the Ship Doc has been generated and based on your item availability, the order can be processed by selecting the appropriate status from the drop down menu. On the top right side of the screen next to Status, use the drop down menu to change the status of your Ship Doc. The following status options will be available for your Ship Doc:
- Payment Pending: Ship Doc is on hold until payment is received.
- Picked: Item has been picked up from the warehouse.
- Voided: The Ship Doc has been voided.
- Shipped: The Items have been shipped.
- Closed: The Order is closed.
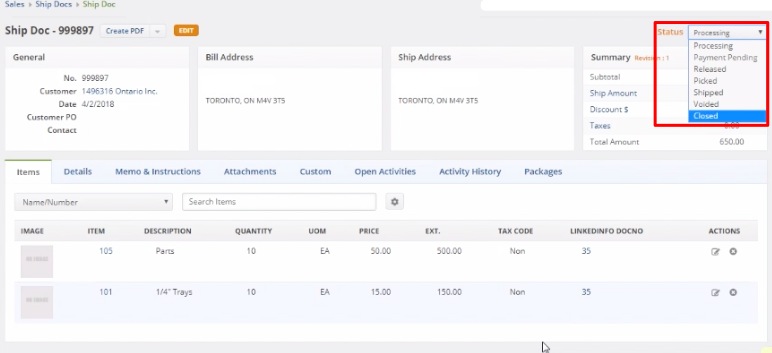

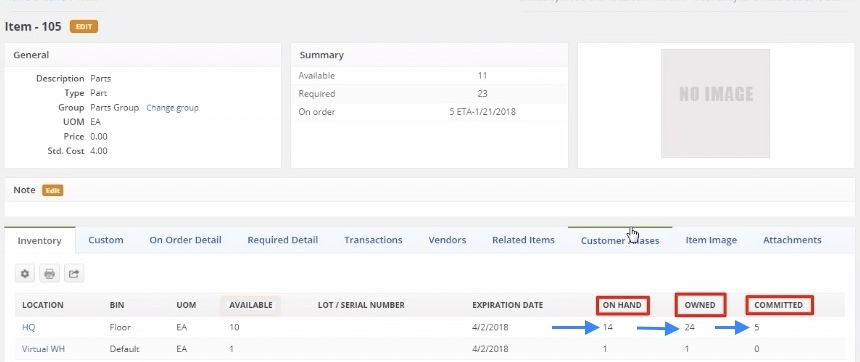
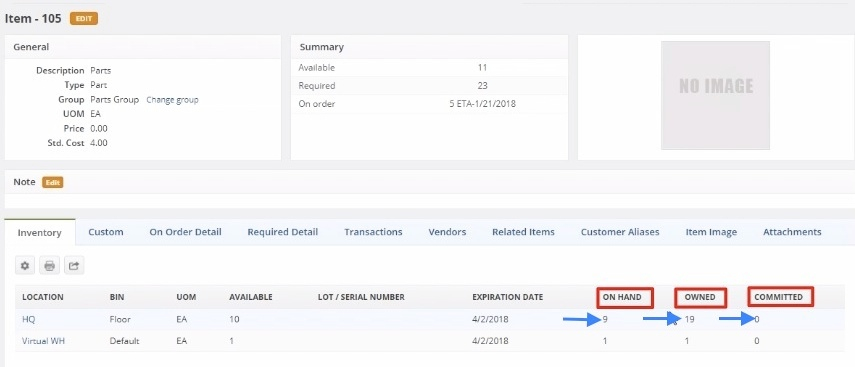
All the statuses are informational up to Shipped. At the point before Shipped, the inventory is shown as Committed, that is, the items are not available but still Owned and On hand.
The status can be changed to Shipped or Closed, depending on the Accounting Integration's specification of the status that should trigger a Sync.
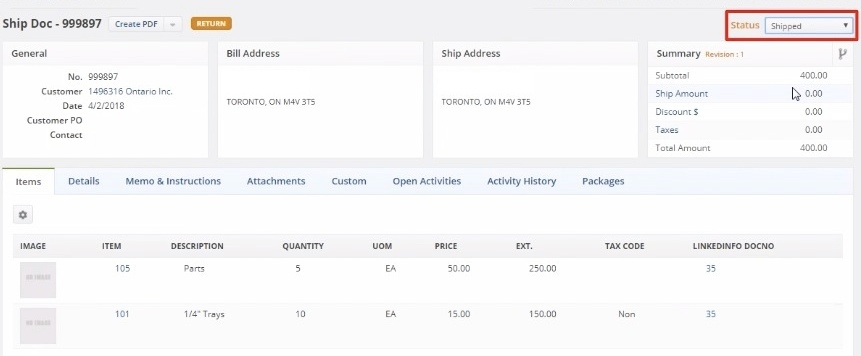 After Shipped, the inventory is removed from Owned and On hand.
Print your Ship Doc
To print your Ship Doc, click on the Create PDF icon next to the Ship Doc number on the screen. The following options are available:
- Save the document to your preferred drive.
- Save and send the Ship Doc to your customer and CC your company associates.
In addition to the standard Sales Order information, the Ship Doc contains a few additional fields such as tracking number, the number of packages in the shipment, and the total weight of the shipment.
If you do not allow negative inventory quantity (meaning the box is checked in Company Preference > Inventory) and you do not have enough inventory, the quantity will be zero or will be the number you currently have in inventory.
You can edit the Ship Doc independently at any time. Once a Sales Order is converted to a Ship Doc, you can edit the quantities manually.