Overview
There are 2 types of Repair Order, Internal & External.
- Internal
- Repair
- Taking broken item in my inventory and repairing it to keep it in stock.
- Repair
- External
- Return & Repair for Customer
- Customer sends in a broken unit, you fix it and return it to the Customer
- Return & Repair for Stock
- Customer sends in a broken unit, you fix it and return the Repaired Item to Stock
- Return & Replace
- Customer sends in a broken unit and you Replace the Item, sending them a Replacement immediately after inspecting the unit.
- Return & Repair for Customer
Learn More about Internal Repair Orders
Learn More About External Repair Orders
Enabling Repair Orders

- Head to Admin > Company Preferences > Repair Orders
- Uncheck the Disable Repair Orders preference
- In order to add a lot or serial number for repair orders, check the option called "For customer repair orders, allow adding a lot or serial no if not contained in the list." (Optional)
- Roll up component Prices to Sales Order (automatically set price on SO line based on components prices)
- Allocate Components when a Repair Order is created or when a component is added
- Scan lot or serial number when creating a Repair Order (not only allows user to scan in serial number instead of typing but can find associated item also if not allowing duplicate lot/serial numbers)
- Select the Default Repair Bin (Optional)
- Click Save
Creating and Editing the Repair Item Group
The Repair Item Group is VERY similar to Service Items that you use in the system already. Components are used like a Bill of Materials that makes up the Repair Item. So you have your components, you repair the item similar to a Work Order, and you end off with an Item.
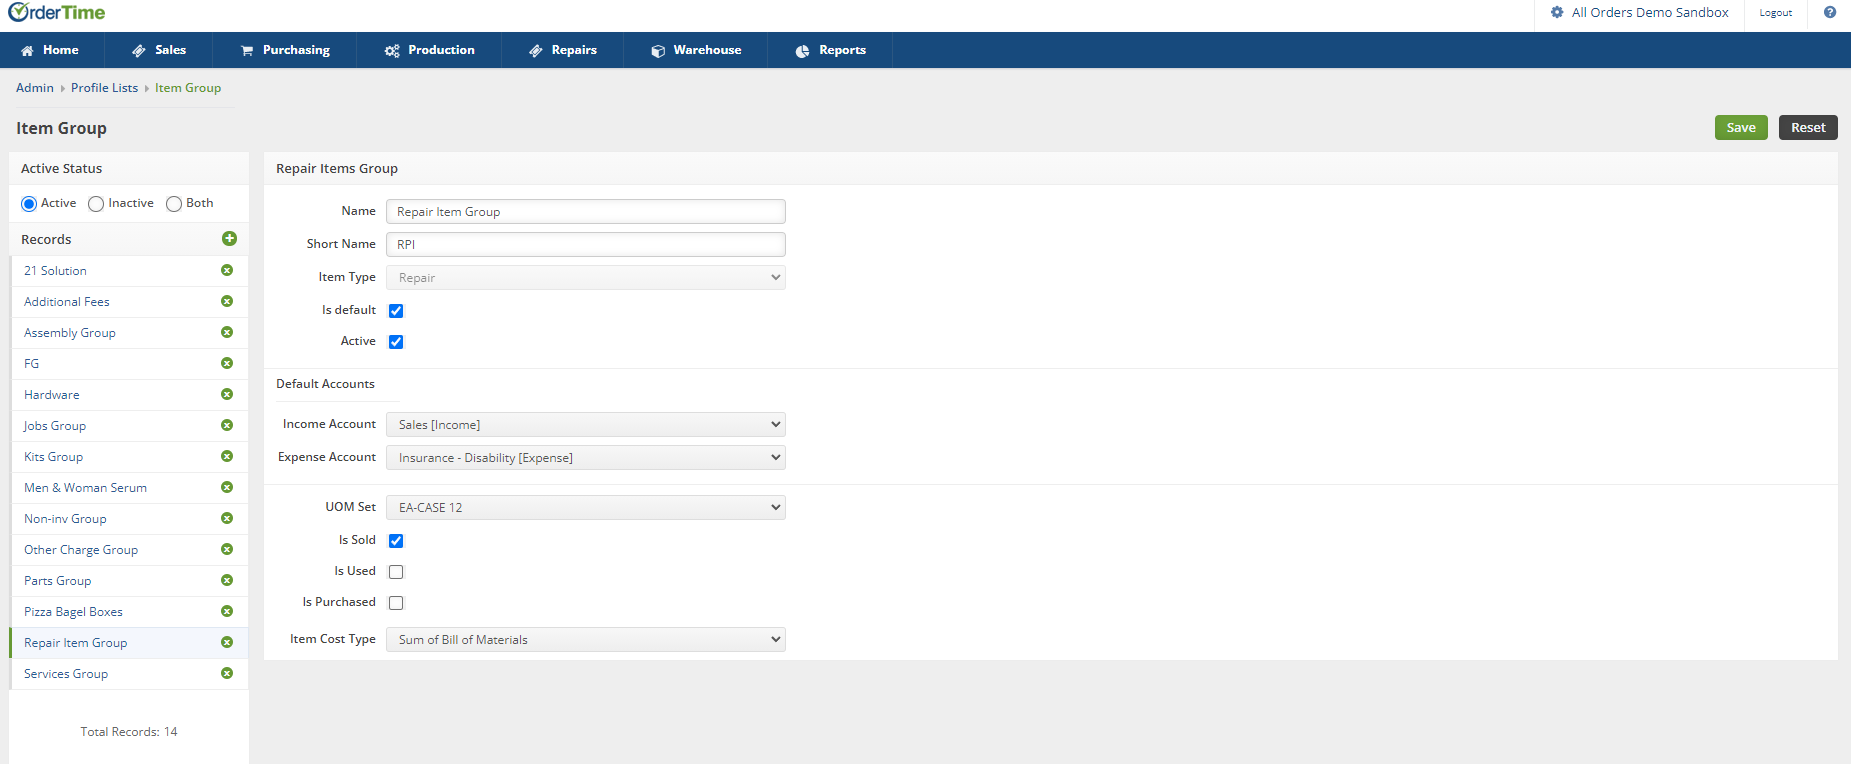
- Head to Admin > Profile Lists > Item Group
- Hit the plus sign on the left to create a new Item Group
- Set a Name & Short Name
- Make sure the Item Type is Repair
- Set the Default Accounts: Income Account, Expense Account
- Make sure Repair Items are either Sold, Used, or Purchased depending on your business
Setting up the Doc Statuses for your Repair Orders
Similar to Doc Statuses for other types of documents, you can customize the statuses you use for Repair Orders.
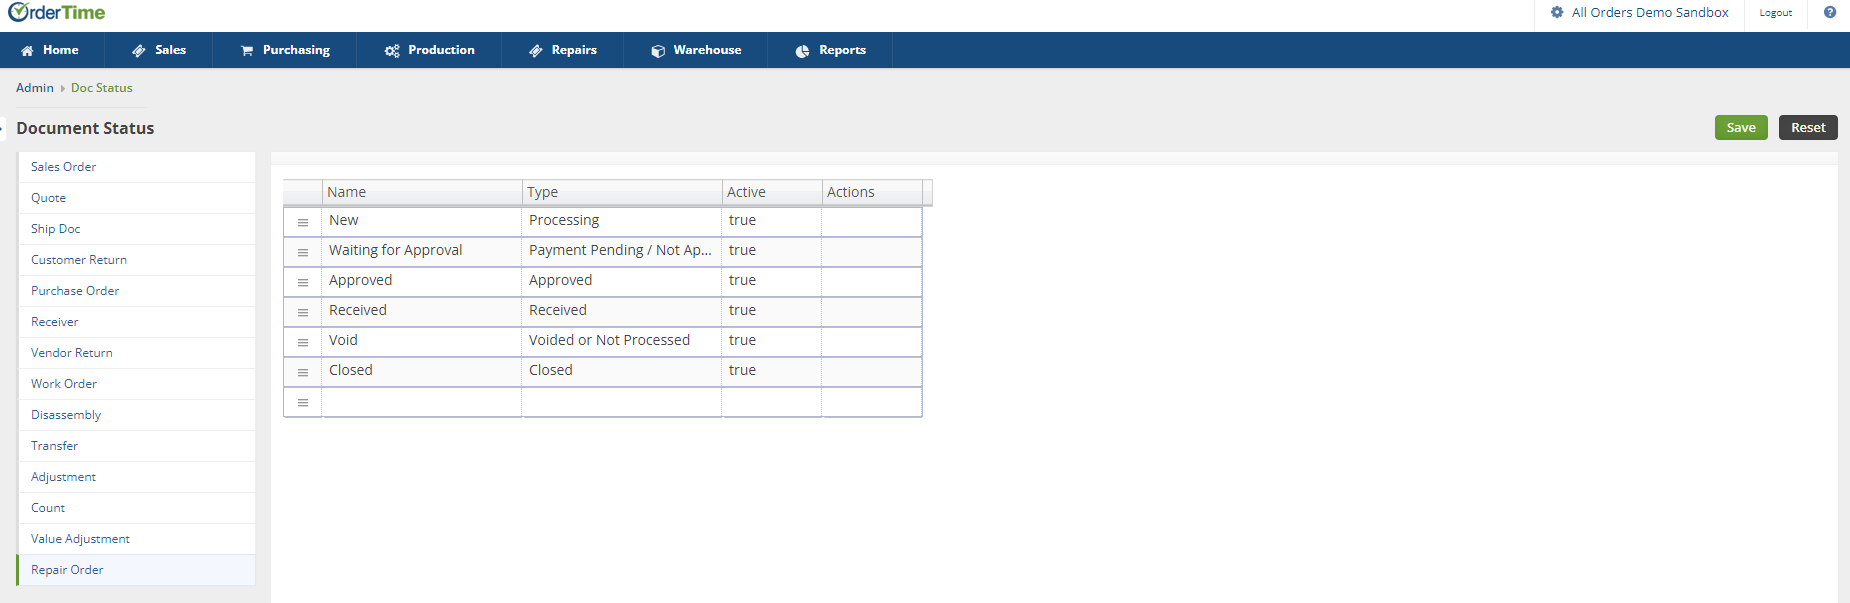
- Head to Admin > Doc Status > Repair Order
- Change the Names as you see fit if you'd like to customize
- Types used for Repair Orders include:
- Processing
- Payment Pending / Not Approved
- Approved
- Received
- Voided or Not Processed
- Closed
Use a Sales Order Custom Field for Sales Order Type
Important: We recommend that you create a Sales Order Custom Field to delineate whether the Sales Order is for a Sale or a Repair. This is for External Repair Orders. External Repair orders are always started with a Sales Order that you add a Repair Item to which begins the whole Repair Order process. You can use this Custom Field to identify Repair Sales Orders on the Sales Order List and to filter them out on Reports.
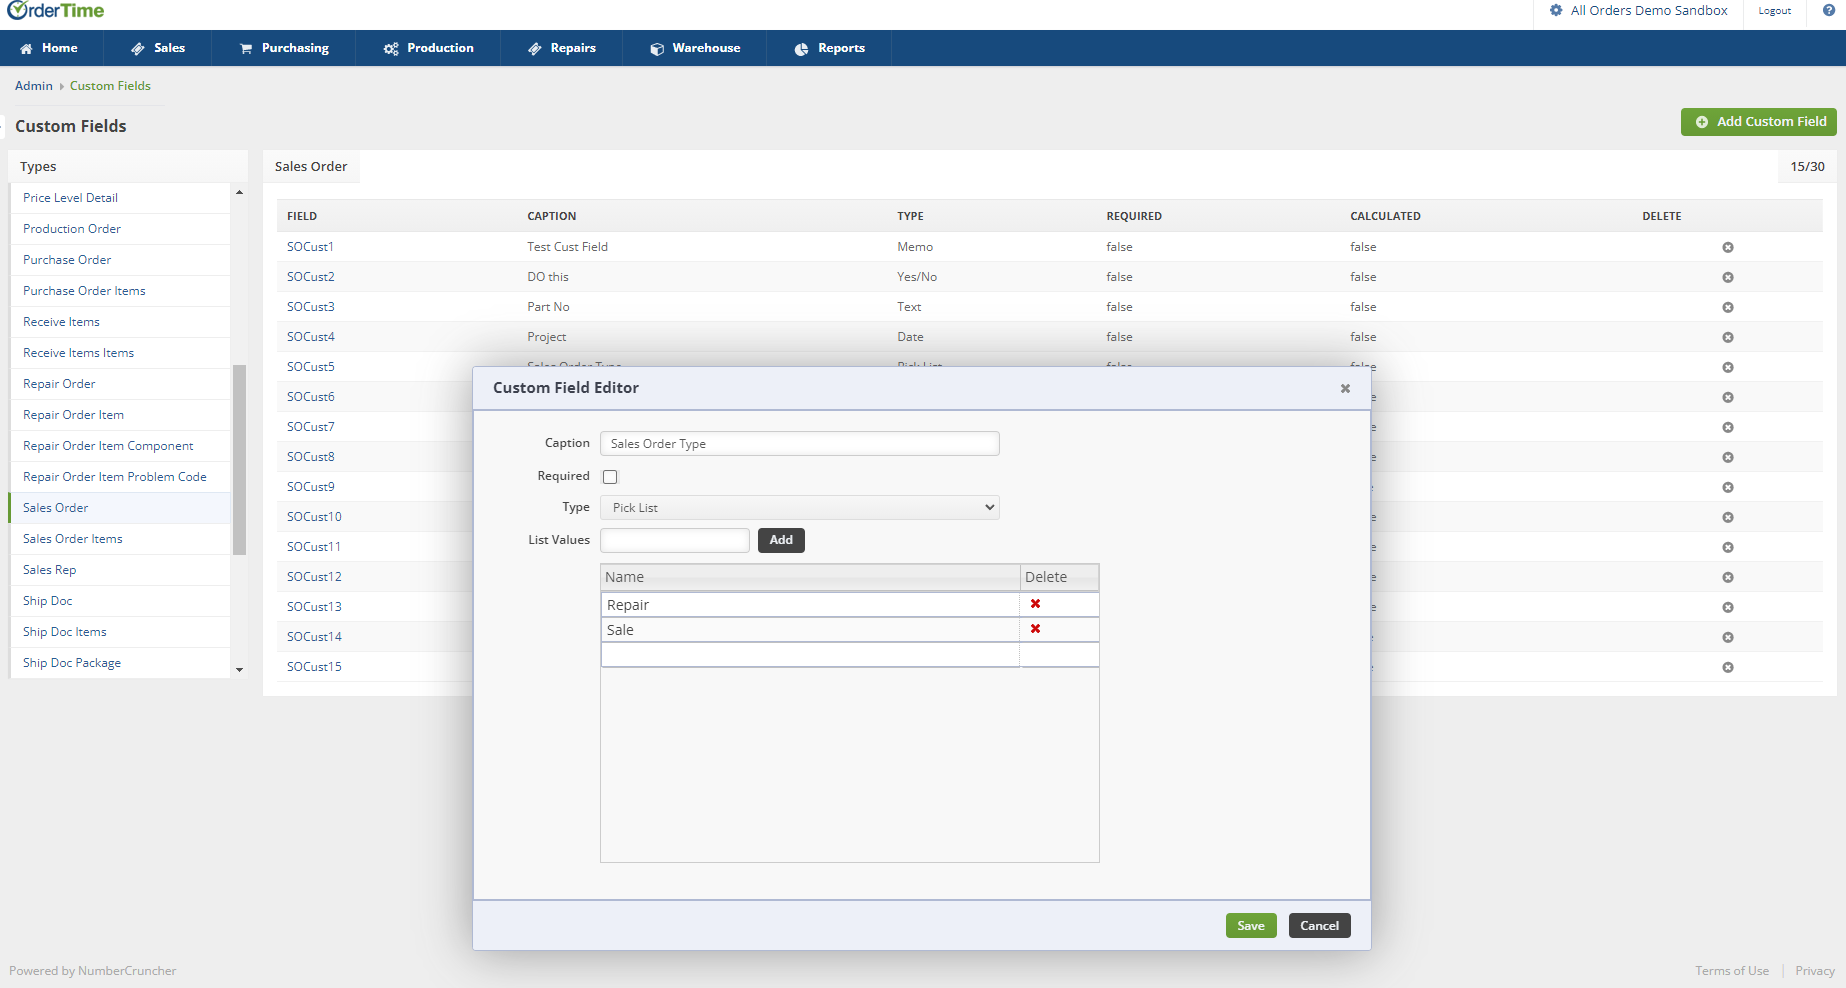
- Head to Admin > Custom Fields
- Select Sales Order
- Click Add Custom Field in the top-right
- Caption it as Sales Order Type
- You might want to make this a Required custom field
- Choose the Type: Pick List
- Make a Value for Repair and a Value for Sale
- Click Save
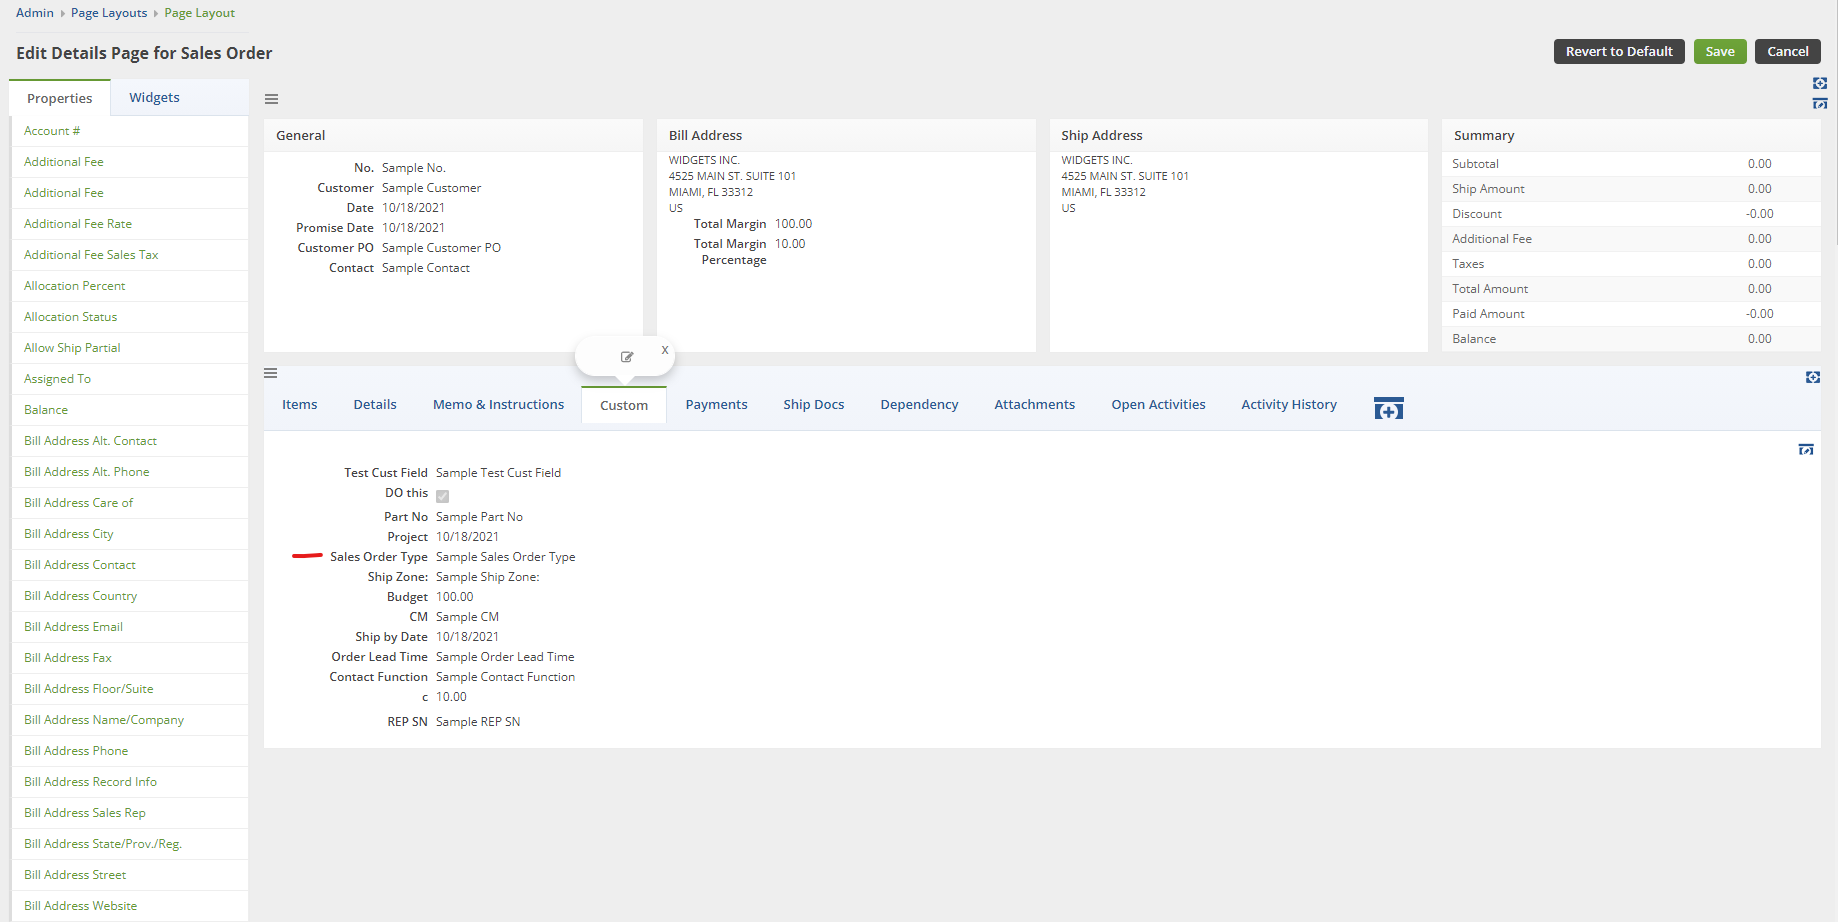
- Head to Admin > Page Layouts
- Click on the Sales Order - Details Page
- Drag Sales Order Type to the Custom Tab
- Click Save
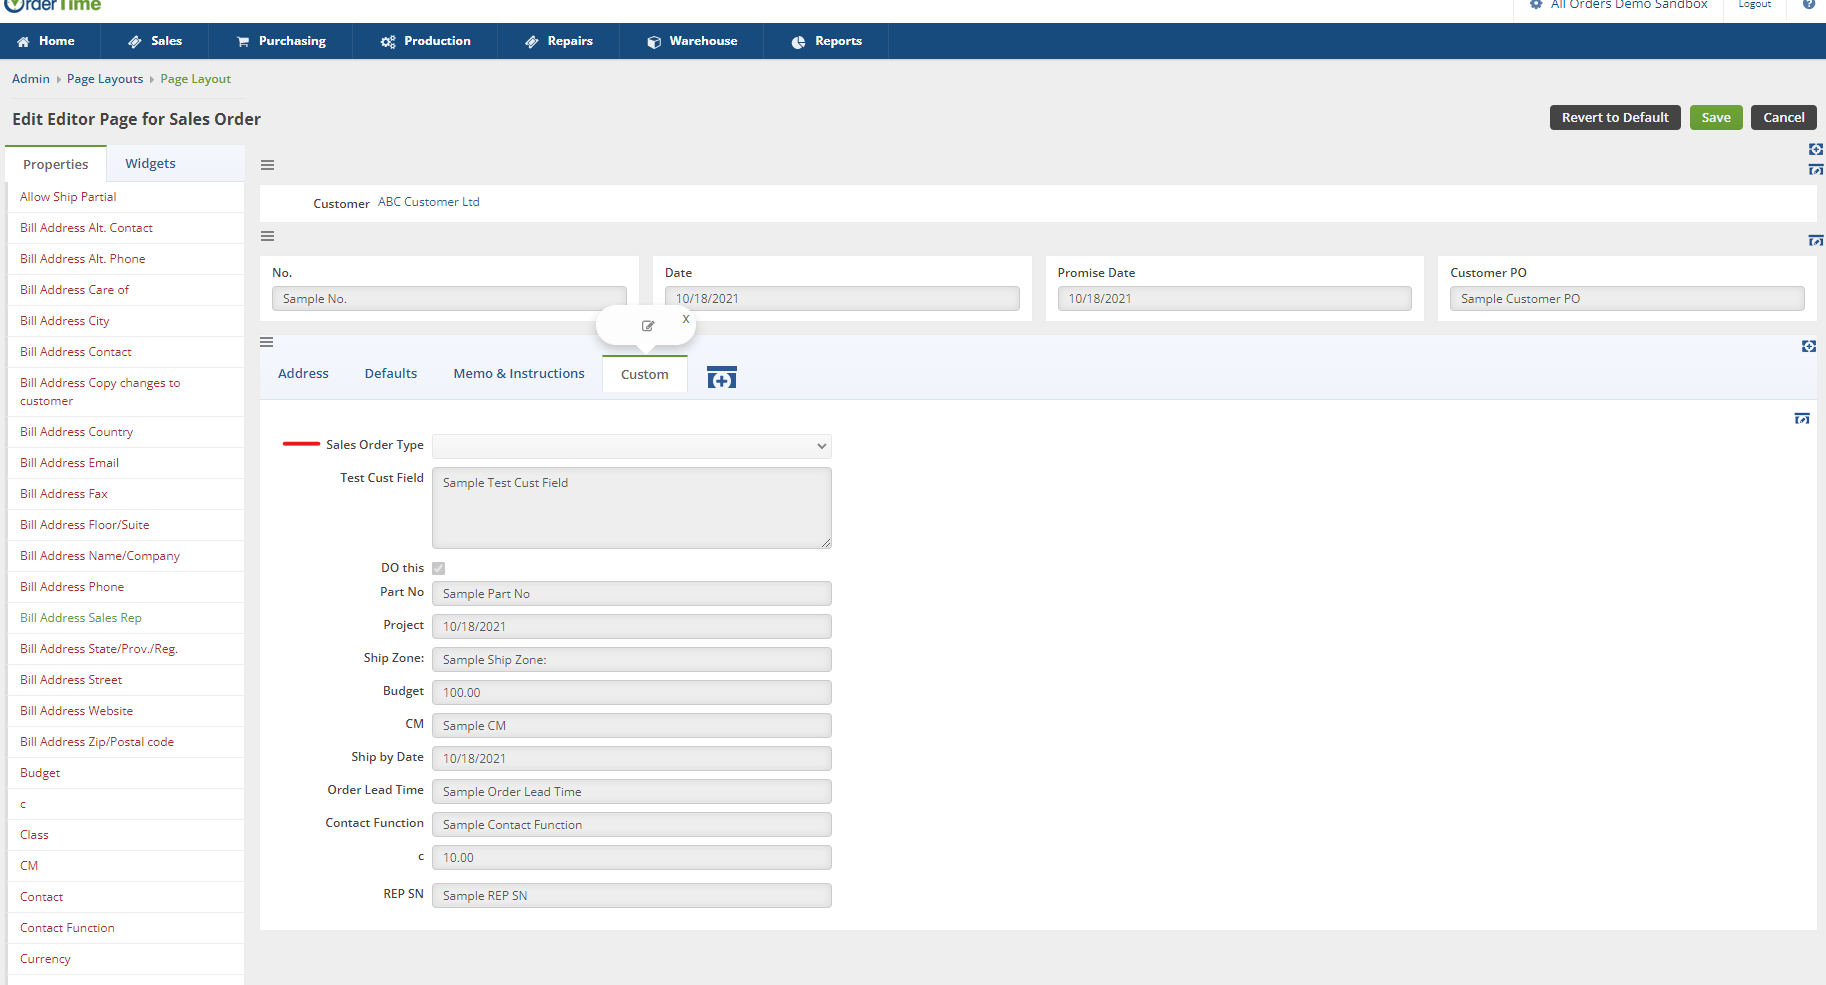
- Head to Admin > Page Layouts
- Click on the Sales Order - Editor Page
- Drag Sales Order Type to the Custom Tab
- Click Save
Editing the Profile Lists —
Repair Order Type, Problem Codes & Warranty Type
Under the Profile Lists you can customize the Repair Names you want to have in the system and their corresponding Repair Type.
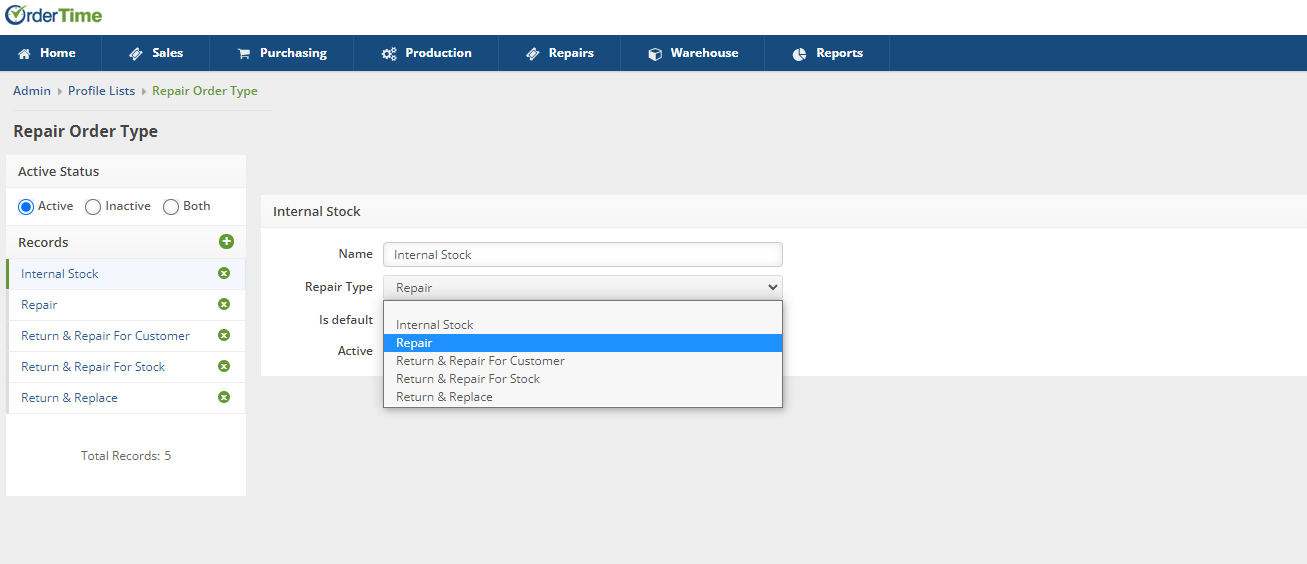
- Head to Admin > Profile Lists > Repair Order Type
- Create new records by clicking the Plus Sign to the right of the word Records
- You can edit the Repair Name
- Choose the Repair Type:
- Repair
- Return & Repair for Customer
- Return & Repair For Stock
- Return & Replace
- Make your custom type the default with Is default or make certain types Active or Inactive
- Click Save
Warranty Types
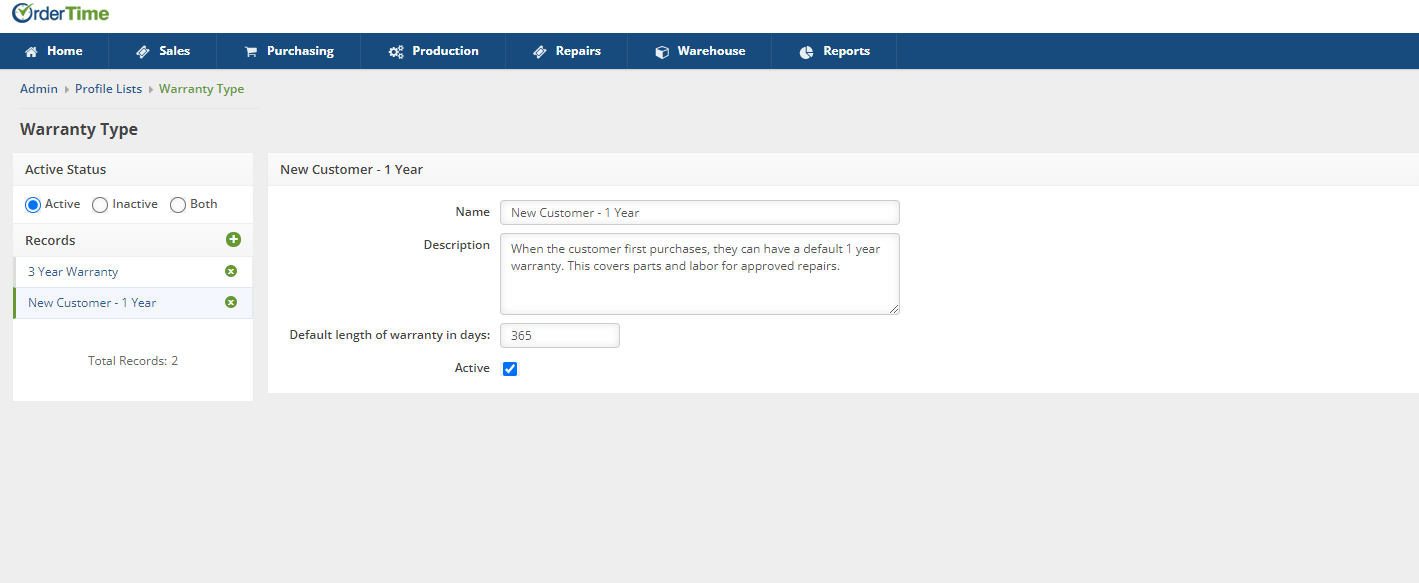
- Head to Admin > Profile Lists > Warranty Type
- Create New Warranty Types by clicking the Plus Sign to the right of Records
- You can set the Warranty Name
- Include a Description of what the warranty covers
- Set a Default Length of Warranty in Days (eg. 1 Year = 365)
- Set the Warranty to Active
- Click Save
Problem Codes
Problem Codes are used to track recurring things that can happen to an Item that needs to be repaired. Multiple problem codes can be applied to a Repair Order. You can make up and completely customize your Problem Codes.
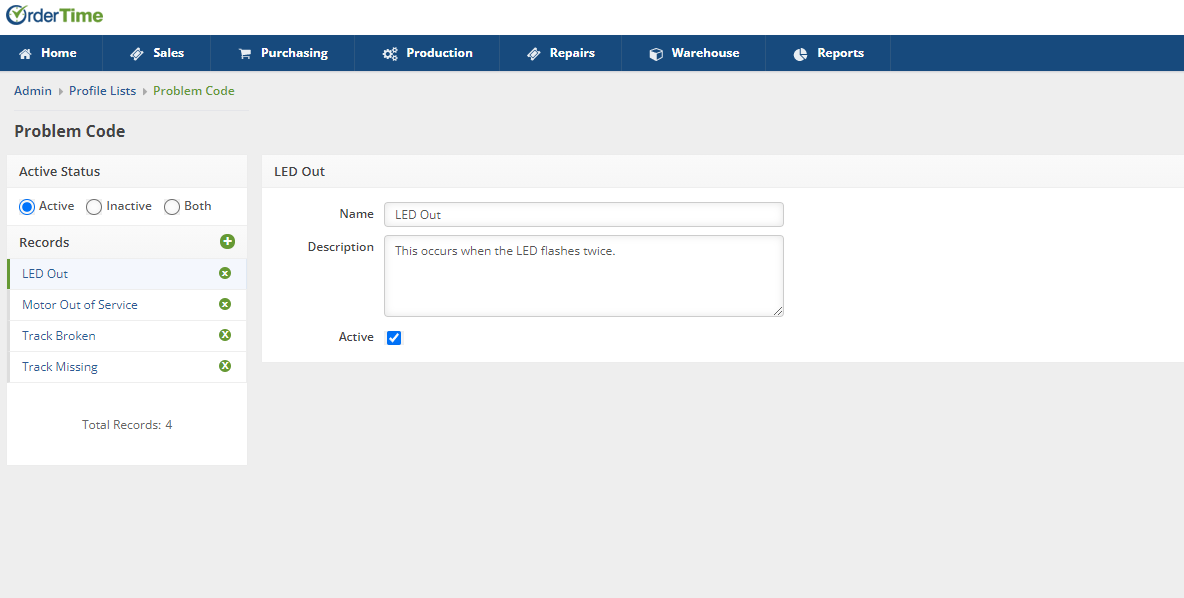
- Head to Admin > Profile Lists > Problem Code
- Add a new Problem Code by clicking the Plus Sign to the right of Records
- You can set the Problem Code Name
- Write a Description for what causes the Problem Code or how to identify the problem
- Set the Problem Code to Active
- Click Save
Add the In Repair column to the Inventory List
This column shows the quantity of that Item that are currently in Repair. This is very helpful to get an at-a-glance look at the stock that is being repaired.
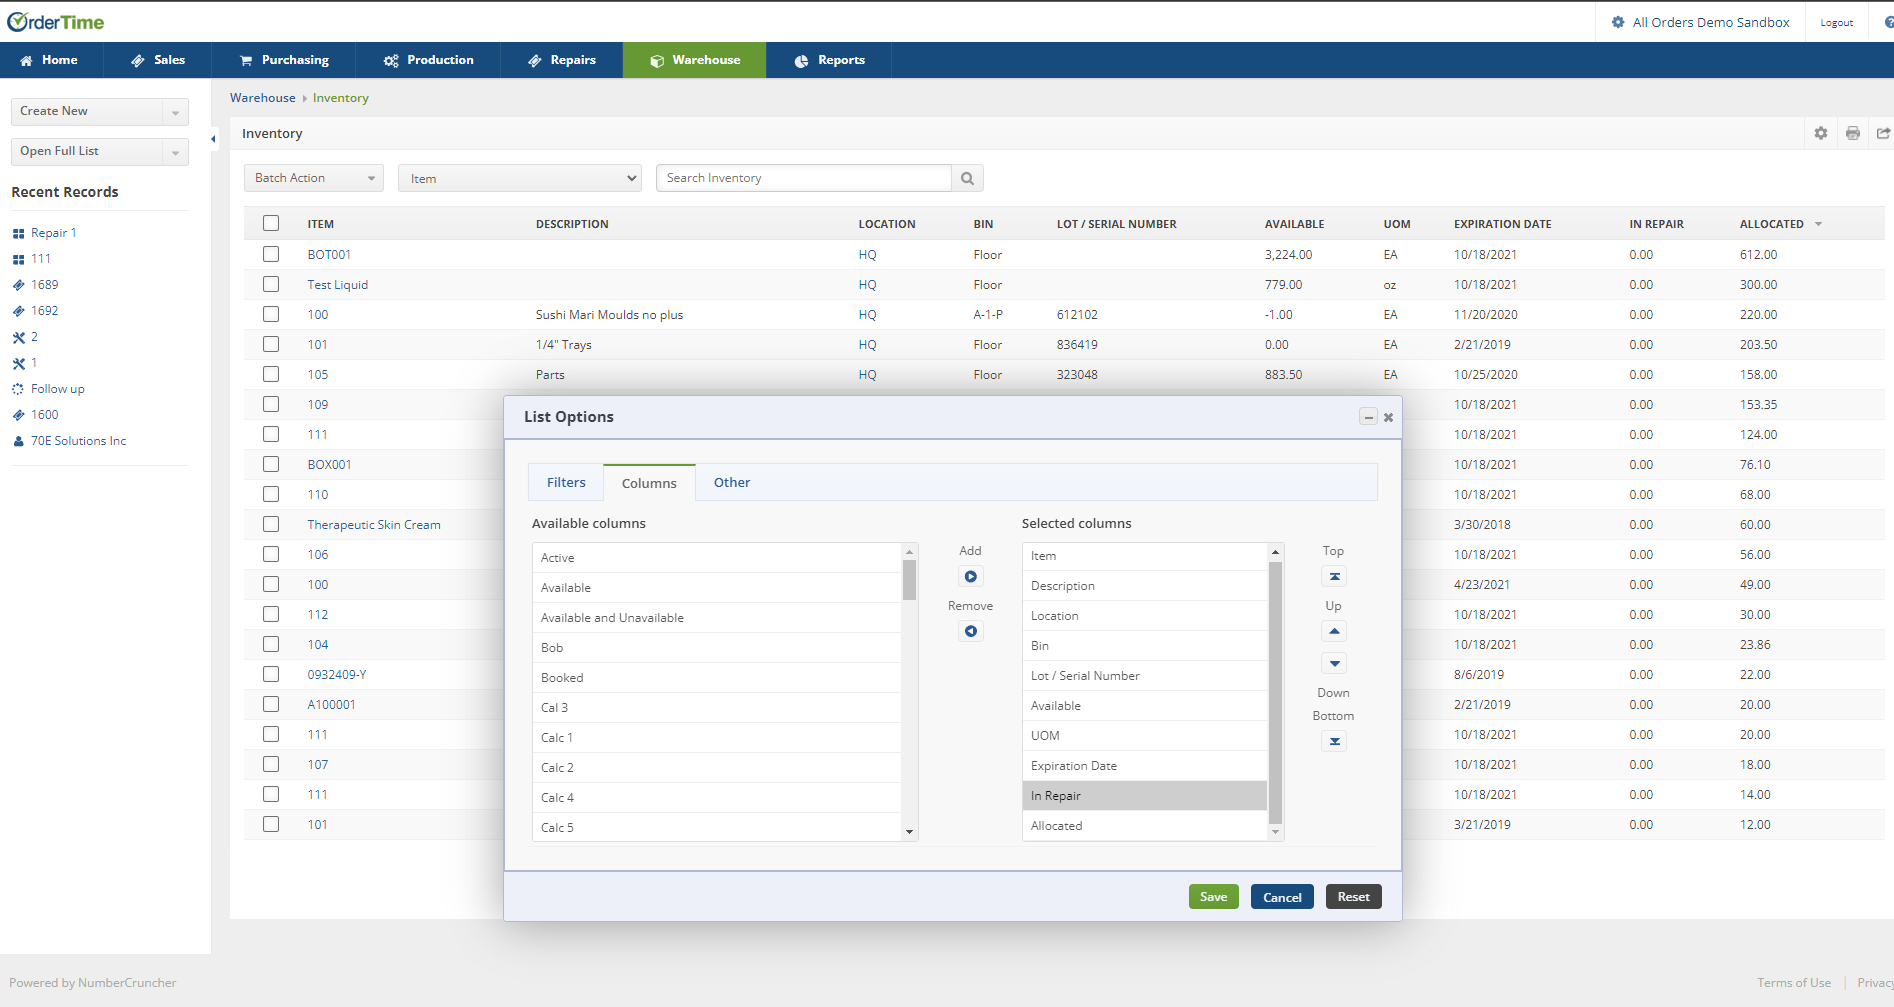
- Head to Open Full List > Inventory
- Click the cog in the top-right of the list
- Click on the Columns Tab
- Select the In Repair column and click Add
- Click Save
