Overview
Setting-up e-commerce integration involves several steps and tasks. This article discusses the pre-requisites and procedures that need to be completed to successfully set up an integration.
E-commerce Integration Considerations
Before the setting-up your e-commerce integration, insure that you have the following:
- Your own business website
- You have generated the connection settings
Setting Up E-commerce Integration
- From the homepage, click on the Gear icon to access the Admin screen.

- Click Ecommerce Integration under the General section.
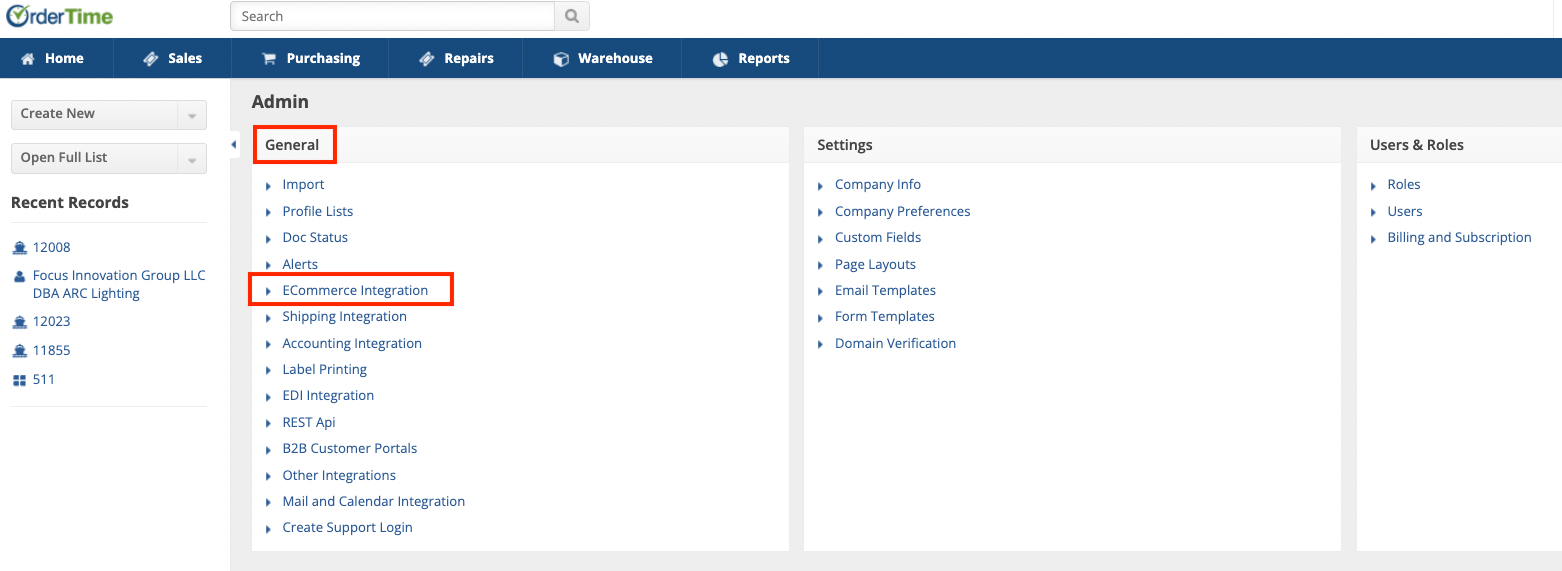
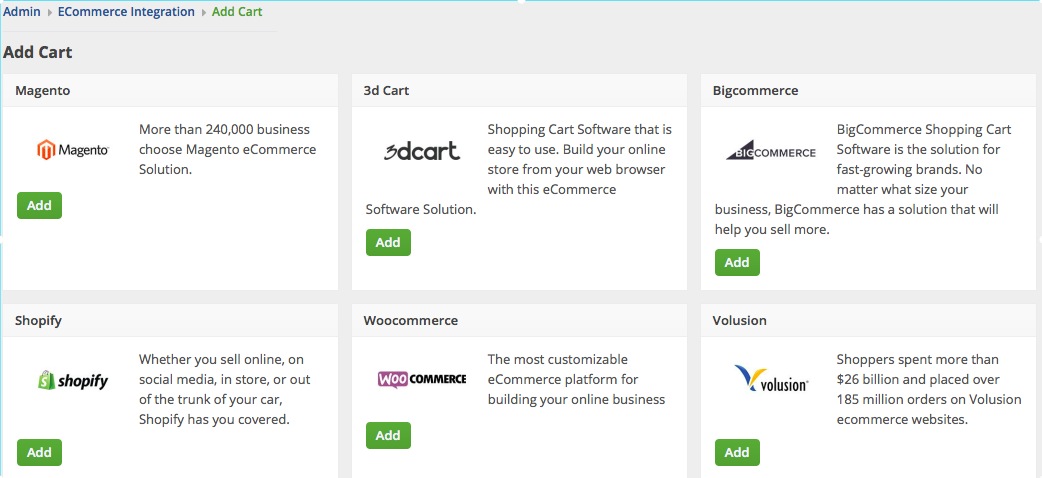
- Select Active and click the Add Cart button.

- Select the e-commerce cart that you want by clicking the Add button.


In the ECommerce Integration Editor page, enter and set the specifications for the integration in the available tabs.
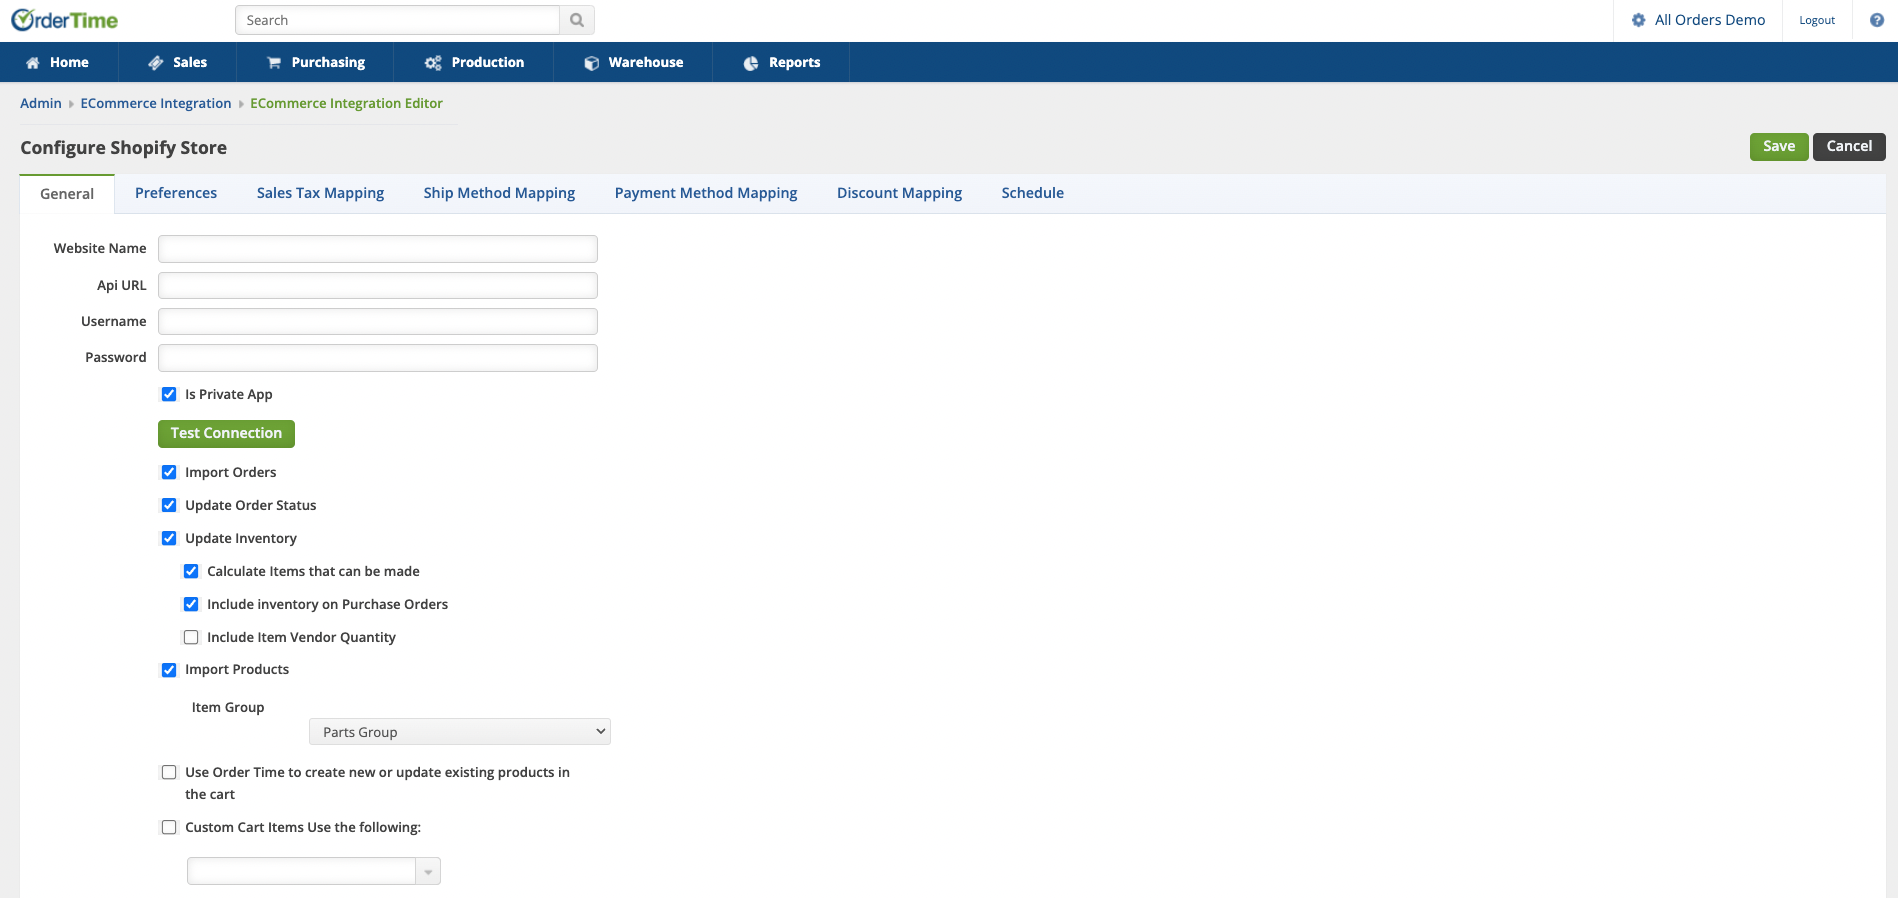
- General
This section where you add the connection credentials you generated from the cart's website. This is also used to test the connection and integration of the carts and Order Time
- Make sure that you have generated the credentials from the e-commerce web store or shopping cart. Refer to Carts to know the steps for getting the connection settings for a specific cart.
- The credentials are the connection settings that you need to provide in the required fields under General tab: Website Name, Api URL, Username and Password. Refer to Carts for the the connection settings for your specific cart.
- Select what you need from the options provided by clicking the corresponding checkbox as follows:
- Update order status
- Select at least one location if you want to limit the inventory to specific location(s).
- Click Test Connection.
- Update Order status is a preference for
- Update inventory
- Calculate Items that can be made
- Include inventory on Purchase Order
- Include Item Vendor Quantity
- Import Products
- Ensure that you specify what group you would like items to be imported into
- Use Order Time to create new or update existing products in the cart
- Custom Cart Use the following: Choose your Custom Cart Items
- Click Save.

- Preferences
The Preferences section is used primarily to control how customers are created in Order Times.
- Complete when you do not want each customer to be saved in the accounting customer list
To see more about using this feature see: Using Proxy Customers for Ecommerce Orders
The integrator must know if the customer is classified as taxable or non-taxable. The appropriate sales tax code and item sales tax must be determined when creating a customer and/or sales order.
- When creating customers and addresses
The Integrator will create customers and ship to addresses if they do not already exist in Order Time. The integrator should be instructed to uniquely identify the customer and ship to addresses by selecting the option that is most appropriate for your company.
Optionally, you can also select the default customer type and/or sales rep when these customers are created.
Additional options when creating customers (and orders) are available in the Sales Tax Mapping, Shipping Method Mapping and Payment Method Mapping.
- When creating orders
- Web Order Status: Processing, On Credit Hold, Payment Pending, Approved, Voided, and Closed.
- Secondary Status: Choose if necessary
- Financial Status: Status to automatically set for Payment info
- Sales Channel Filter: Set if necessary
- Shopify/Ecomm Status: Sets the status for the order over in your Ecommerce Integration
Regardless of Status if an Order is Archived it will NOT be imported!
- When the transaction is created in order time
- Type: Choose between Sales Order/Ship Doc
- Initial Order Status: Status to be set when creating the transaction
- Default Location: Default Location for these transactions
- Default Class: Default Class to set for these transactions
- Map Web Order Number to: Custom field that can be used to map your Web Order Number which is the number for this transaction in your Ecommerce Cart
- Place Order on Hold if Greater Than: If an order is imported that is greater than the total entered in this box then the order will automatically be placed on hold in Order Time. Leave blank if you do not want to enable this option.

- Sales Tax Mapping
If you charge sales tax, the integrator must know the appropriate sales tax code and item sales tax to use when creating customer and/or sales order. This is done by examining the state in the Billing Address. You can also identify the customer's state using the shipping address.
In Order Time, sales tax calculations are driven by the combination of Sales Tax Code and Item Sales Tax.
Note: For non-US customer, only the Sales Tax Code is needed. The Sales Tax codes determine whether the customer is taxable and the Item Sales Tax is the rate at which sales tax is charged.
- Taxable customers
- Select the Default Sales Tax Code. This is typically 'Tax'.
- Select the Default Item Sales Tax.
- Specify the state mapping. For each state in which you charge sales tax, select the Item Sales Tax and type the state (usually the abbreviation) into the grid cell. To delete the entry, select the row on the grid and press the delete icon under the Action column.
- Add any specific State mapping that applies
- Non-taxable customers
- Select the Default Sales Tax Code.
- Select the Default Item Sales Tax.
- Select the Default Shipping Sales Tax.
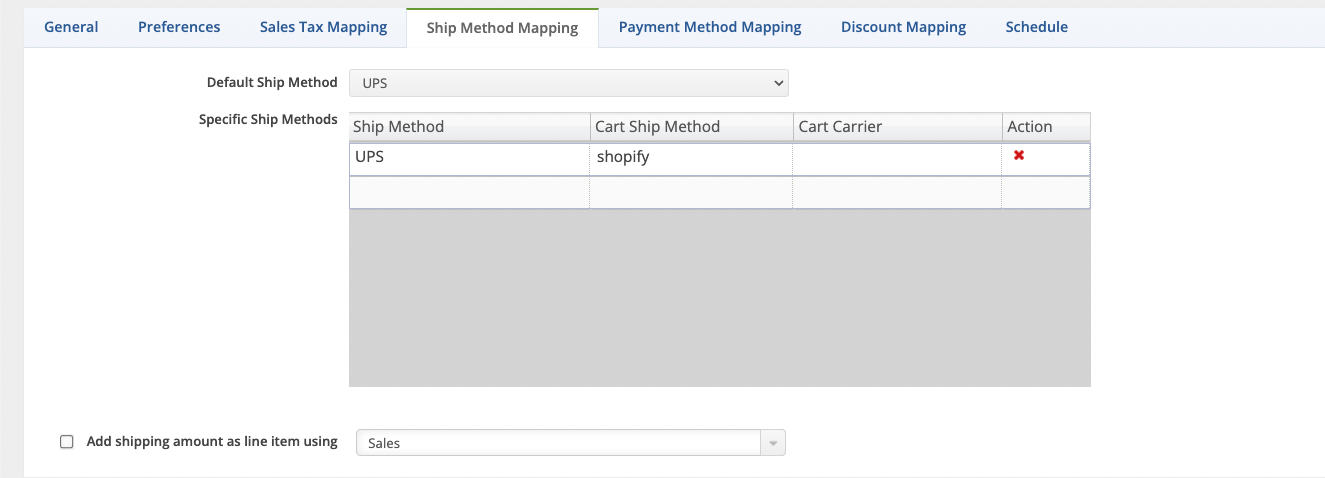
- Ship Method Mapping
Typically your cart orders will have shipping method and charges. The integrator needs to know how to map the shipping methods in your cart with the shipping methods in Order Time. If Order Time orders does not find the correct shipping method then the sales order created in Order Time will not be accurate.
- At the minimum, you should select a default shipping method. This is used when Order Time associates the shipping method used on the cart with a shipping method in Order Time.
- You can also specifically map the shipping methods in Order Time with the shipping methods in your cart. Using the drop down list, select a Ship Method and type in the associated Cart Ship Method.
- Enter the Cart Carrier.
- The integrator can either enter the shipping amount in the Freight box on the sales order or as a separate line item. To use a separate line item, check the box and 'Add shipping amount as a line item using the item' and select an Item.
- To use the Freight box, the shipping methods in Order Time must have an associated Other Charge Item. To do this, go in Order Time and from the main menu select Lists --> Profiles Lists --> Shipping Methods. Then for each shipping method, select an 'Other Charge' from the drop down list and click Save. If the drop down list is empty, create an item using the 'Other Charge Group'.
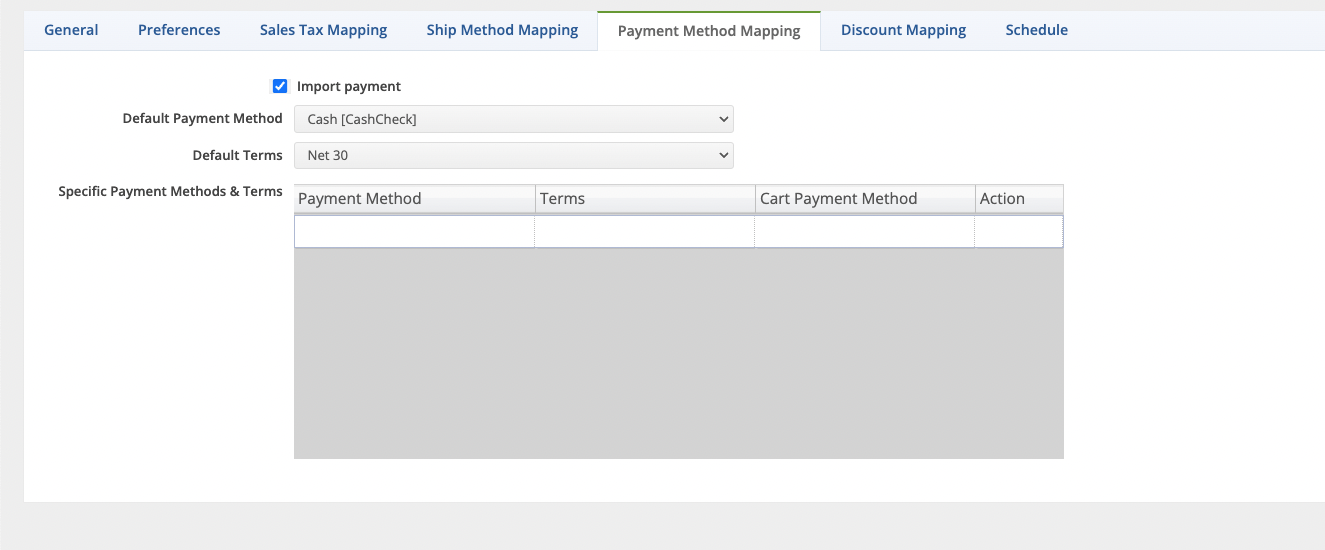
- Payment Method Mapping
If you want the integrator to add a payment to a sales order then you will need to supply a Payment Method and Term. If you want to enter the payments manually outside of Order Time, leave the Payment Method and Terms blank.
In Order Time the Term defines whether a payment is required. You control this by setting the Term Type for each Term within Order Time (Lists --> Profile Lists --> Terms). In order for the payment to show when the order is created, the Term Type cannot be Account Receivable (No-cash payment).
- Check Import payment.
- You can either specifically map a payment method and term to the cart payment method or you can use the Default globally.
- To specifically map a payment method and term to the cart payment method, select the payment method and terms from the drop down list and type the cart payment method into the box grid cell.
- Click Save.
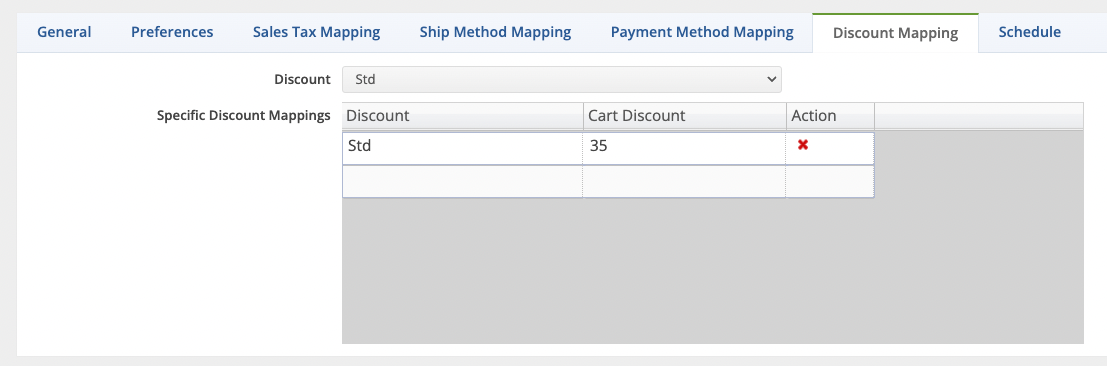
- Discount Mapping
- Set the default Discount
- For specific Discount Mappings, put each in individually
- Hit Save afterwards to save any edits
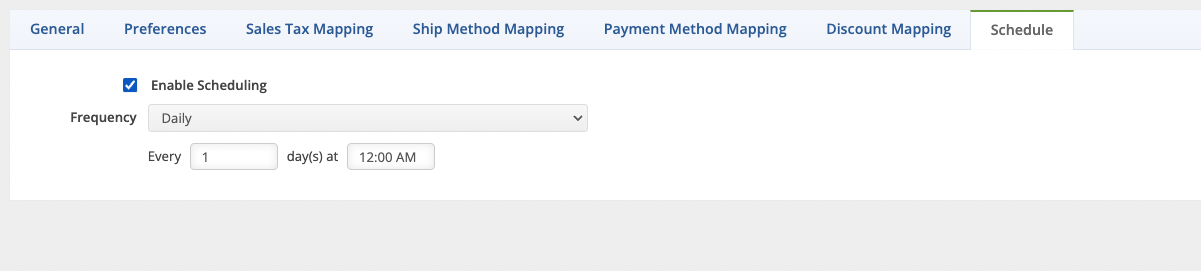
- Schedule
Set the frequency integration job by following these steps:
- Click the Enable Scheduling box.
- Select the Frequency from the picklist.
- Set the recurrence by selecting the interval and time.
- Click Save.
E-commerce Job
The Sync Job is how Order Time controls what gets synchronized with your cart. You can initiate an e-commerce job to sync right away or you can put it in your schedule. With e-commerce integration, once you add your credentials and initiate connection testing, the scheduling starts immediately
A Sync Job must be finished before another one can be created.
The e-commerce job triggers the importing of orders and customers from your web site, as well as, updating the order status and inventory quantities to your website. You will be informed via email when an E-commerce Job is completed and if there any errors. You can click the hyperlink to view the errors.
